Setting up CVO in Azure as DR site for on premises ONTAP based storage – Proof of concept.

Alexandru Vasile
Senior Storage Engineer - Netapp
First Part is to get some basic understanding of the moving pieces.
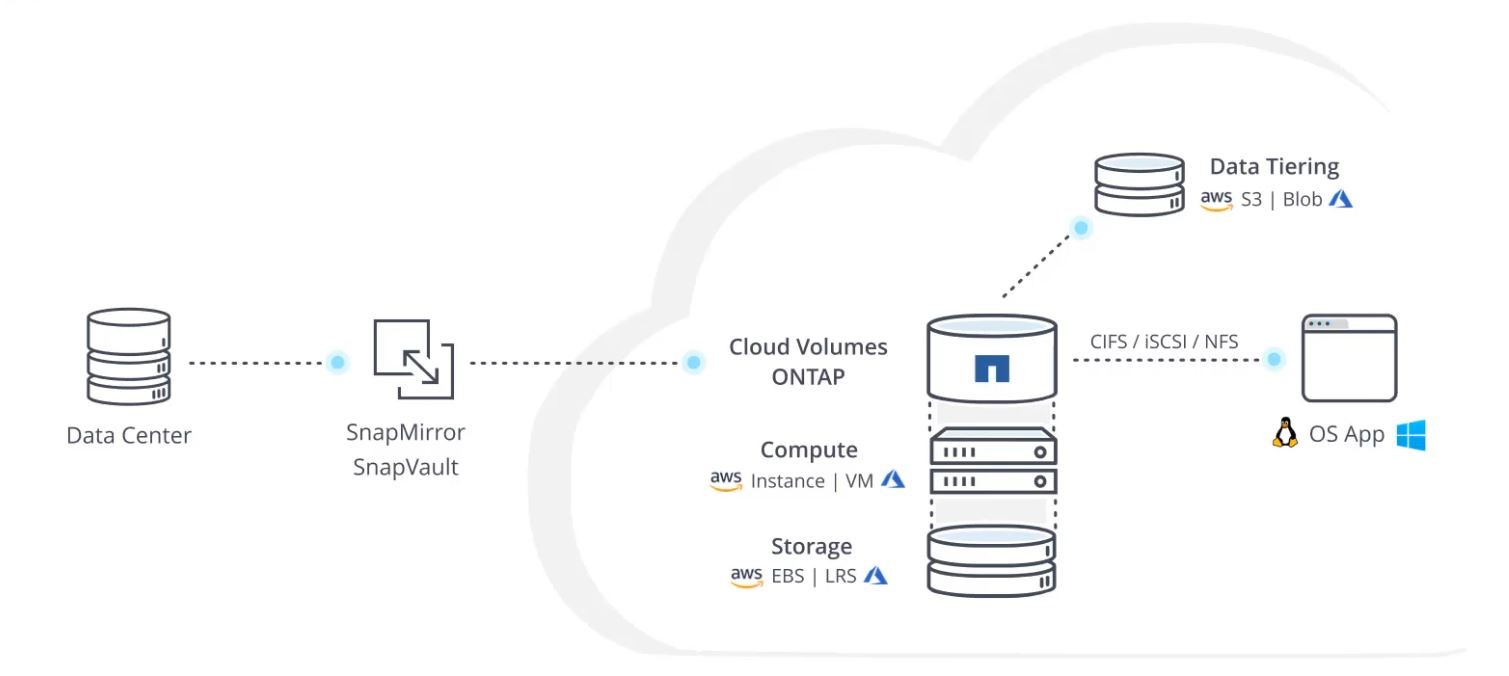
What is CVO ?
NetApp Cloud Volumes ONTAP is a software-only storage subscription running the NetApp ONTAP storage software offering you control of your data with the power of an enterprise storage software solution. Building your cloud storage environment on Cloud Volumes ONTAP provides enterprise-class features for your cloud storage.
- Non-disruptive, two node high-availability (HA) support keeps you operating against unplanned storage failures in the cloud
- Provision both NAS and SAN storage with NFS, CIFS and iSCSI support
- Minimize your storage footprint with efficiency features such as data deduplication, thin provision inline data compression
- Zero-impact NetApp Snapshot™ copies with near-instantaneous point-in-time backups of your data without taking additional storage resources
- NetApp SnapMirror® technology brings your hybrid cloud environment together by tying on-premisesFAS storage to your Cloud Volumes ONTAP environment.
- Get advanced data management features with the OnCommand management suite of tools from indepth monitoring and tracking of storage with OnCommand Insight to detailed storage instance control with OnCommand System Manager.
- Replicate data across availability zones to ensure application availability Cloud Volumes ONTAP is deployed and managed from OnCommand® Cloud Manager giving you a simple point and-click environment to manage the software and underlying cloud infrastructure for your cloud storage solution.
Netapp Cloud Manager
NetApp OnCommand® Cloud Manager provides management for your ONTAP hybrid enterprise storage environment, including the ONTAP Cloud storage service and All Flash FAS (AFF) and FAS systems. OnCommand Cloud Manager brings together your data fabric with a single management interface independent of your data location.
This solution eases the day-to-day requirements of your ONTAP Cloud storage in both Amazon Web Services (AWS) and Microsoft Azure, including configuring, provisioning, and monitoring each of your active virtual and hardware storage nodes.
OnCommand Cloud Manager also is the deployment environment for ONTAP Cloud software, offering a point-and-click installation and automatically selecting and assigning resources to each instance.
When you deploy ONTAP Cloud, Cloud Manager uses your cloud credentials to select the compute and storage necessary to run the instance of your choice. With visibility into the actual resources consumed by each instance, Cloud Manager monitors and tracks cloud resource utilization, which you can later use in assessing your environment.
Resources : https://docs.netapp.com/us-en/occm/pdfs/fullsite-sidebar/Cloud_Manager_3_8_docs.pdf
Netapp Cloud Manager can be installed on premises or in the cloud running as a virtual machine ( compute ) ; for POC purposes Cloud Manager will run as a VM on premises , hosted by a CENTOS 7 .
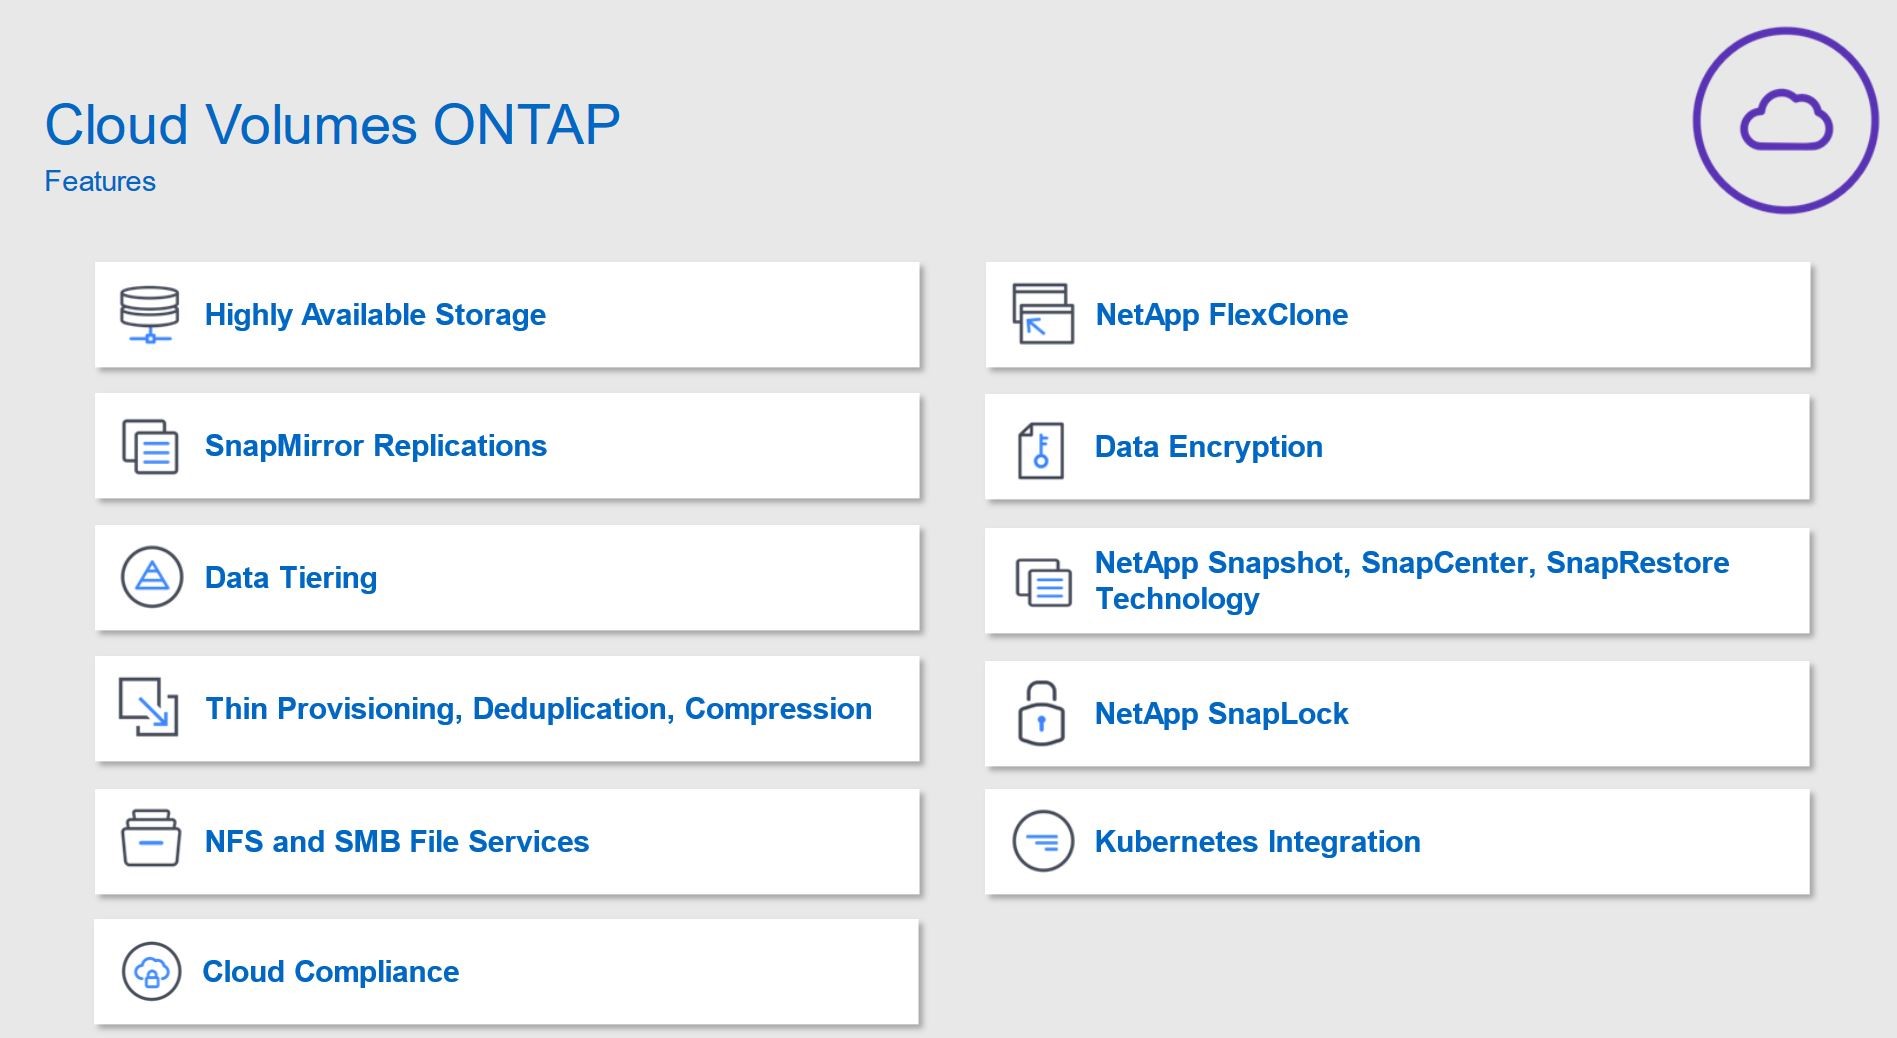
Cloud Volumes ONTAP Features :
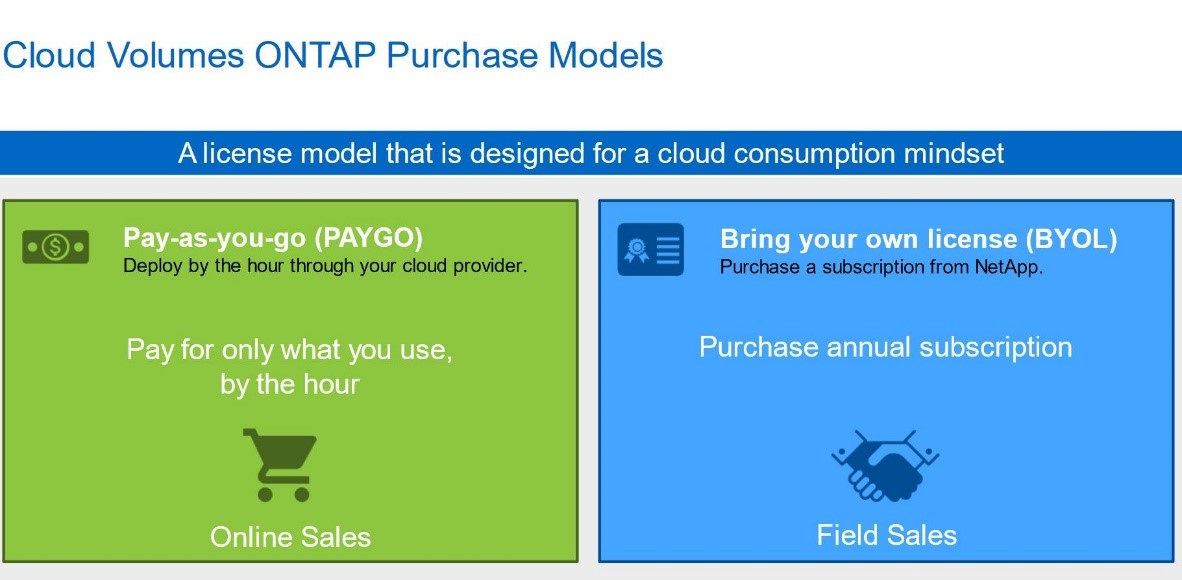
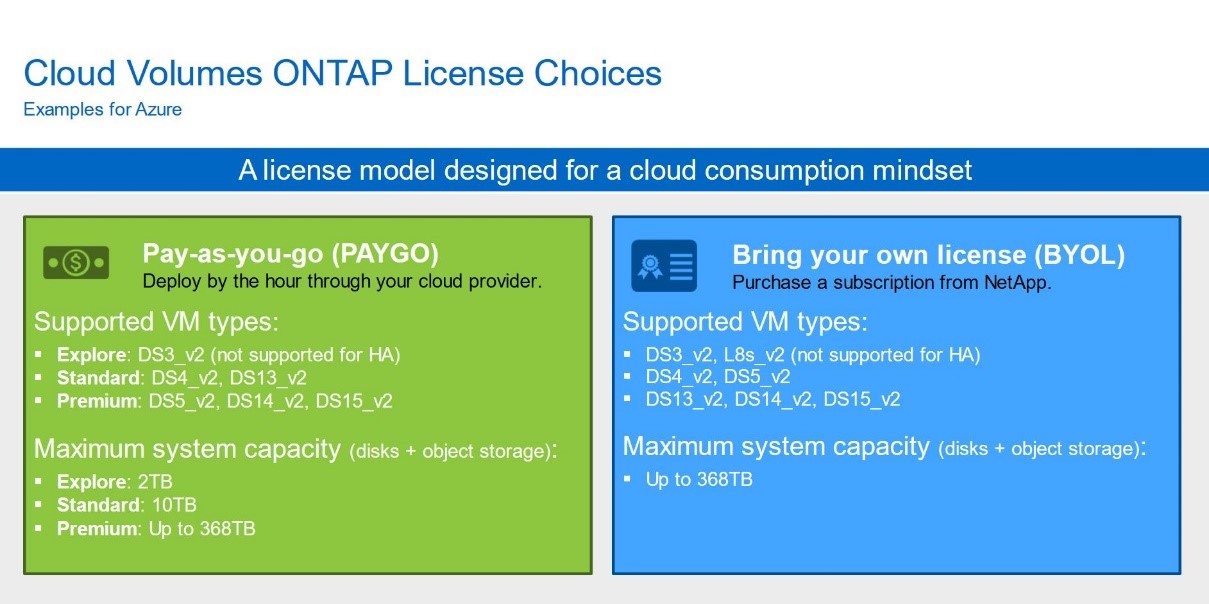
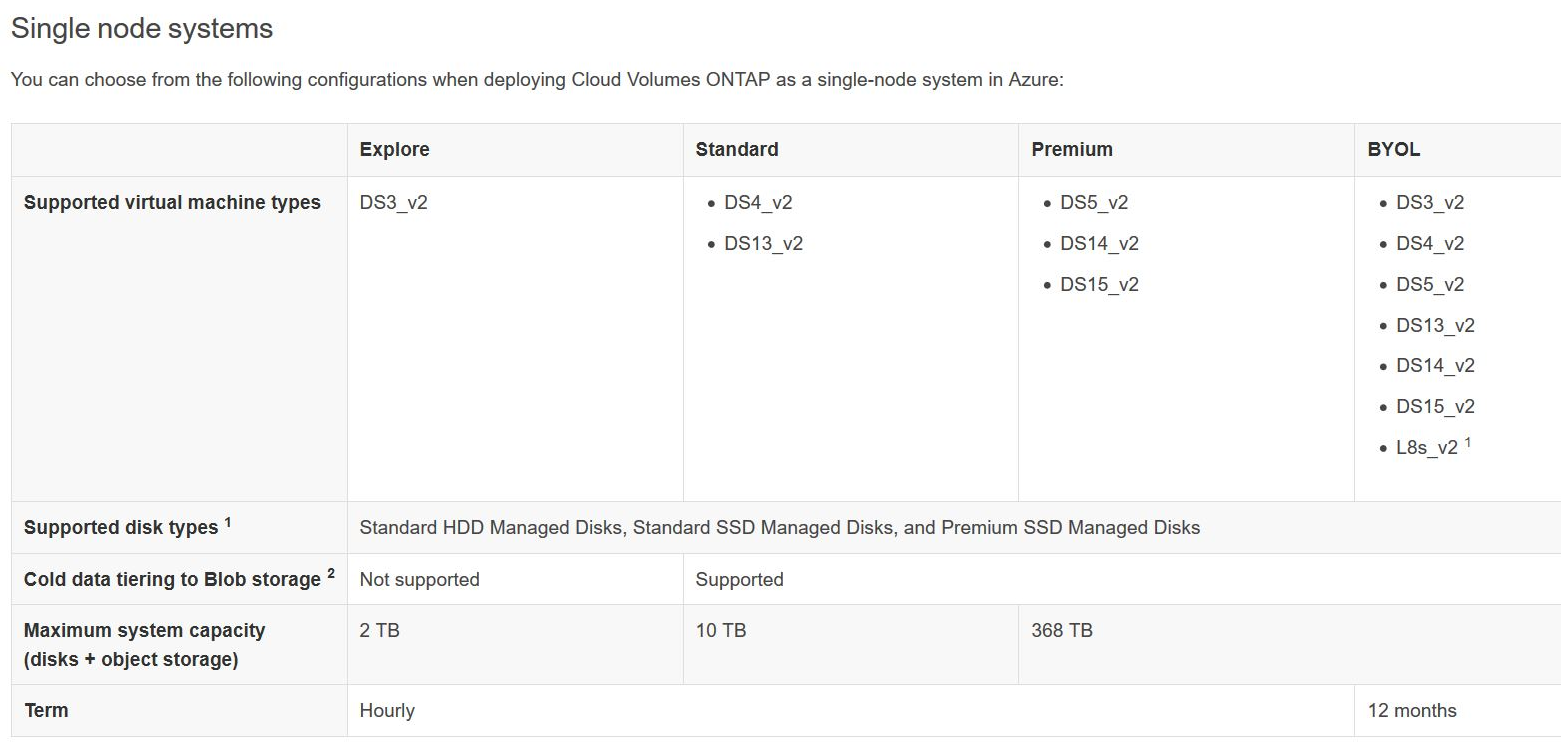
CVO Purchase and License choices in MS Azure:
Cost Calculator for Azure : https://cloud.netapp.com/azure-calculator
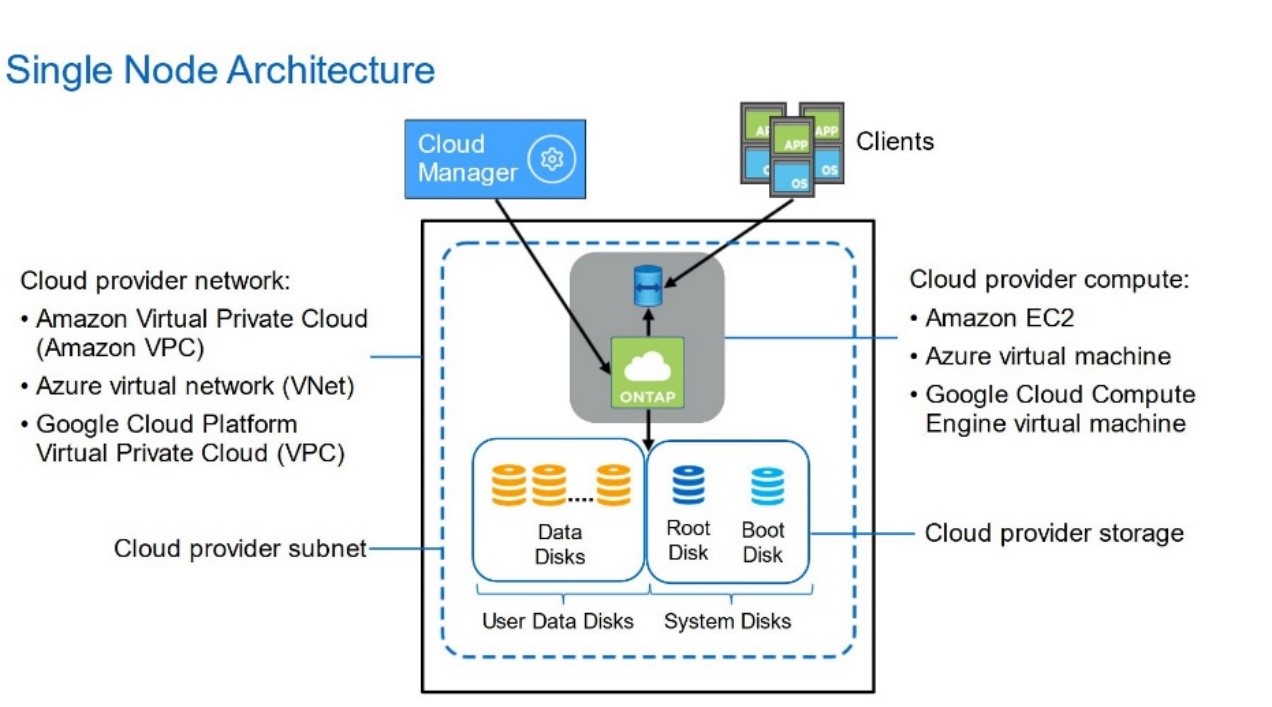
CVO Architecture (for POC we will use single node architecture):
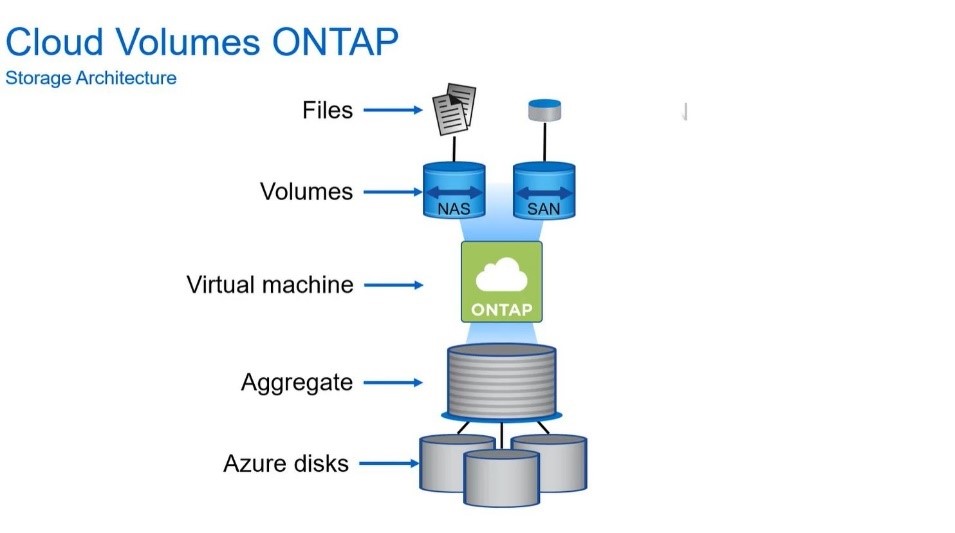
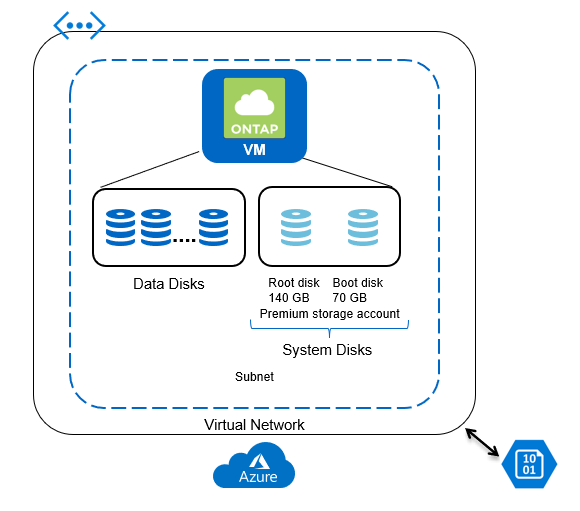
Architecture in Azure simplified from CVO point of view :
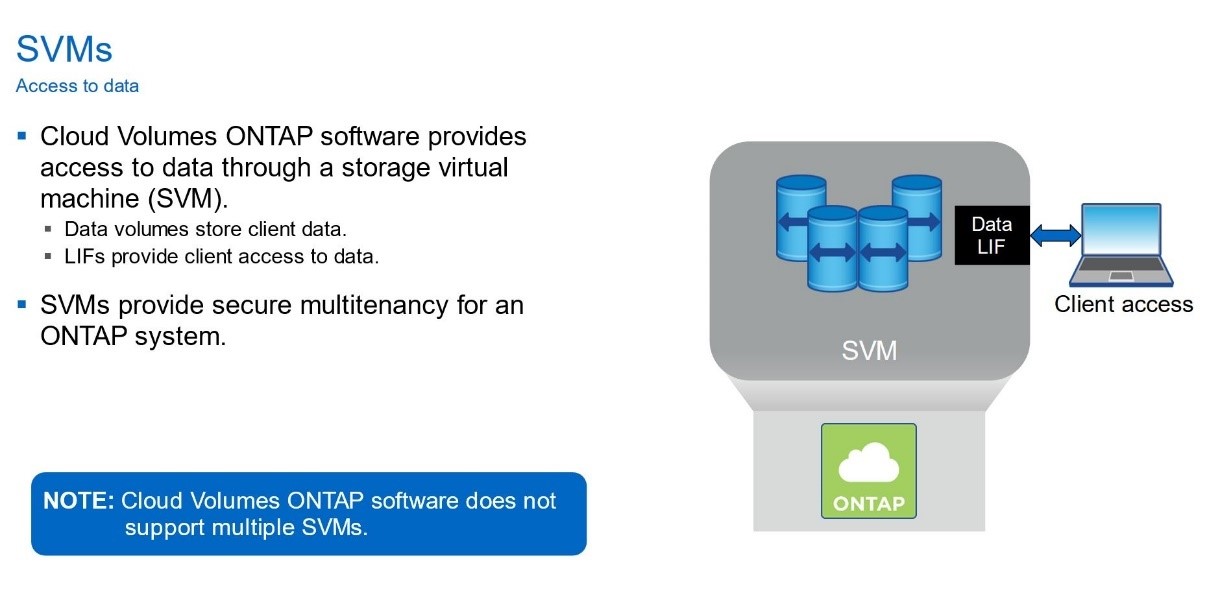
Cloud Volumes ONTAP and Storage Virtual Machines ( SVM’s )
Azure Network and Storage resources used in the POC:
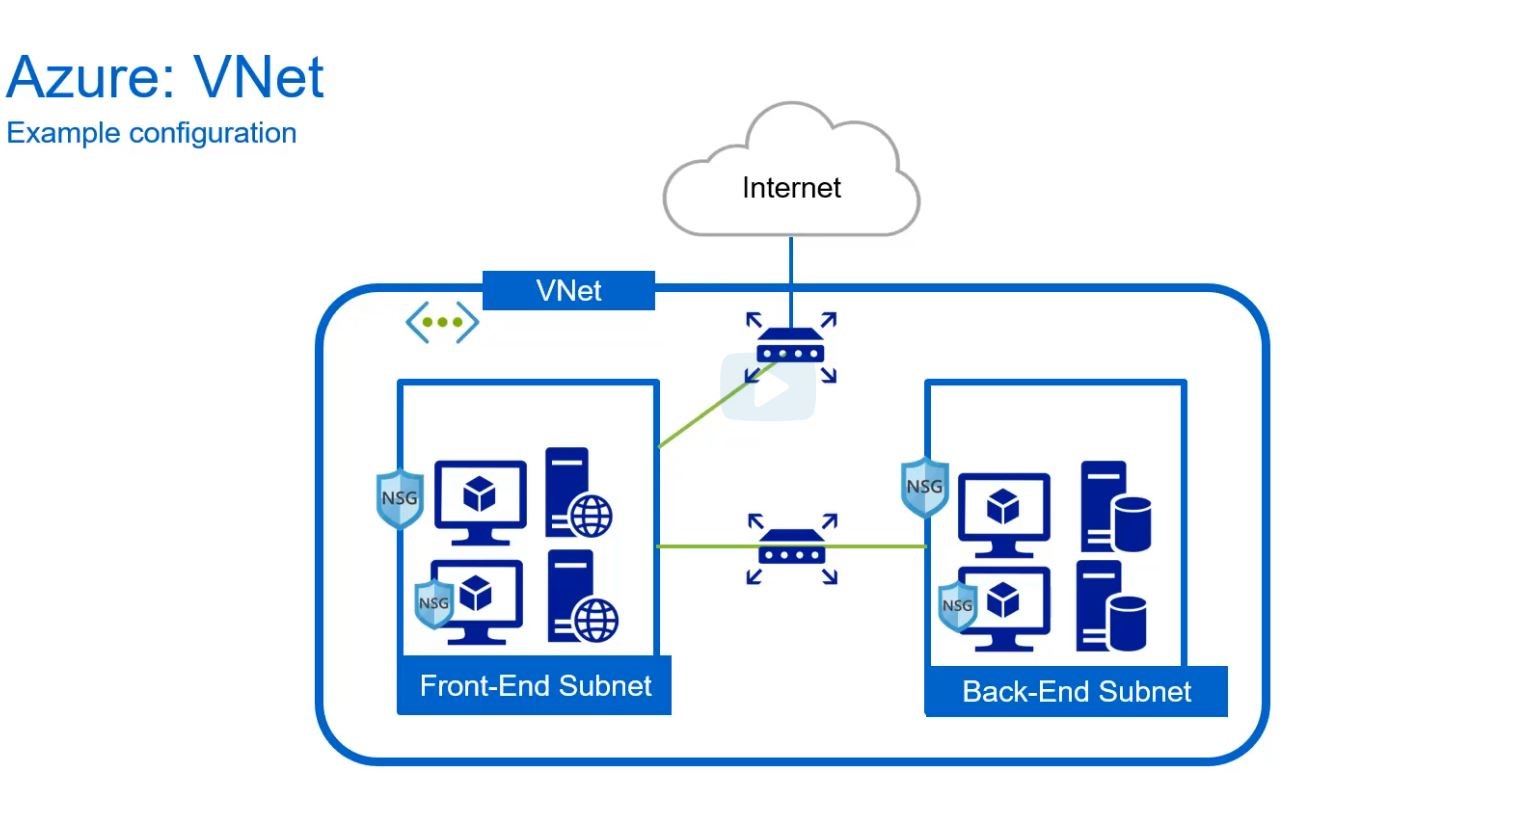
Azure Virtual Network (VNet) is the fundamental building block for your private network in Azure. VNet enables many types of Azure resources, such as Azure Virtual Machines (VM), to securely communicate with each other, the internet, and on-premises networks. VNet is similar to a traditional network that you'd operate in your own data center, but brings with it additional benefits of Azure's infrastructure such as scale, availability, and isolation.
Resources : https://docs.microsoft.com/en-us/azure/virtual-network/virtual-networks-overview
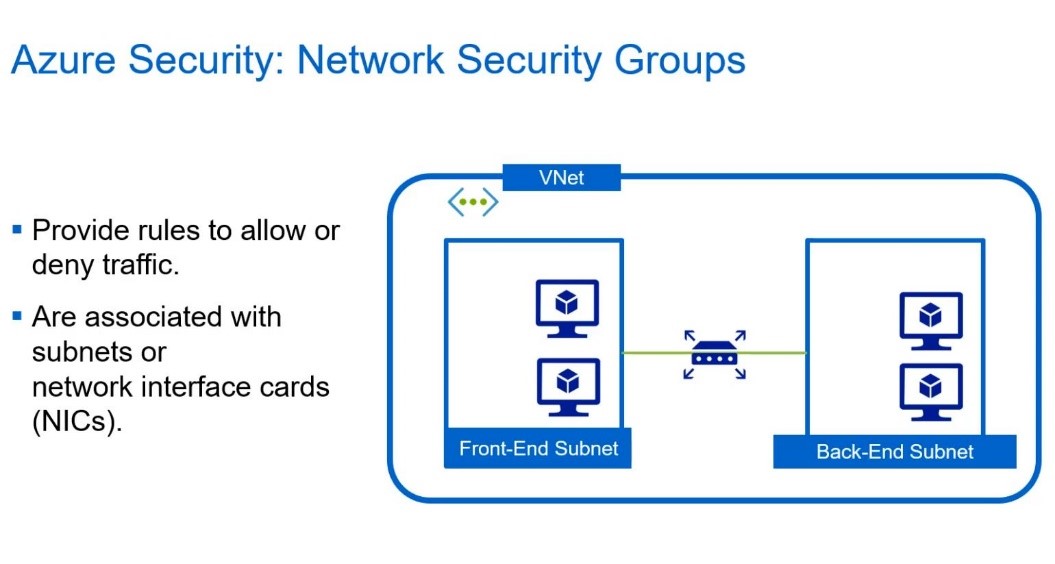
You can use Azure network security group to filter network traffic to and from Azure resources in an Azure virtual network. A network security group contains security rules that allow or deny inbound network traffic to, or outbound network traffic from, several types of Azure resources. For each rule, you can specify source and destination, port, and protocol. This article describes properties of a network security group rule, the default security rules that are applied, and the rule properties that you can modify to create an augmented security rule.
Resources : https://docs.microsoft.com/en-us/azure/virtual-network/security-overview
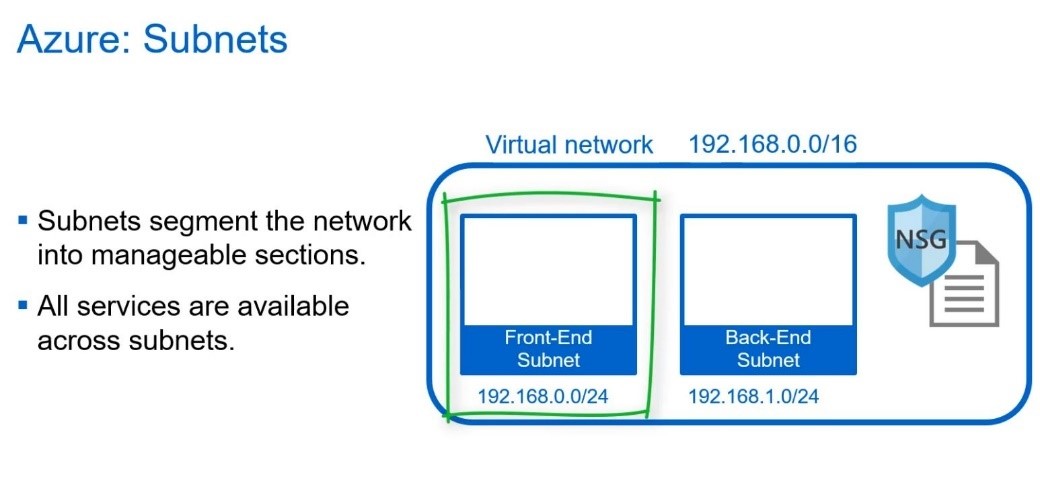
Resources : https://docs.microsoft.com/en-us/azure/virtual-network/virtual-network-manage-subnet
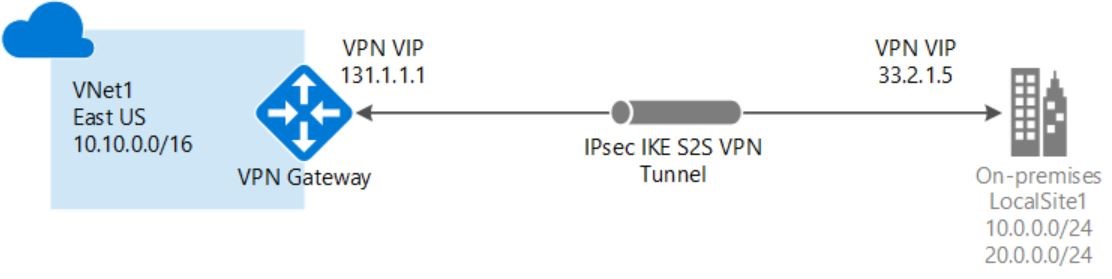
VPN Gateway
A VPN gateway is a specific type of virtual network gateway that is used to send encrypted traffic between an Azure virtual network and an on-premises location over the public Internet.
You can also use a VPN gateway to send encrypted traffic between Azure virtual networks over the Microsoft network. Each virtual network can have only one VPN gateway. However, you can create multiple connections to the same VPN gateway. When you create multiple connections to the same VPN gateway, all VPN tunnels share the available gateway bandwidth.
Resources : https://docs.microsoft.com/en-us/azure/vpn-gateway/vpn-gateway-about-vpngateways
Setting up the environment for CVO DR scenario:
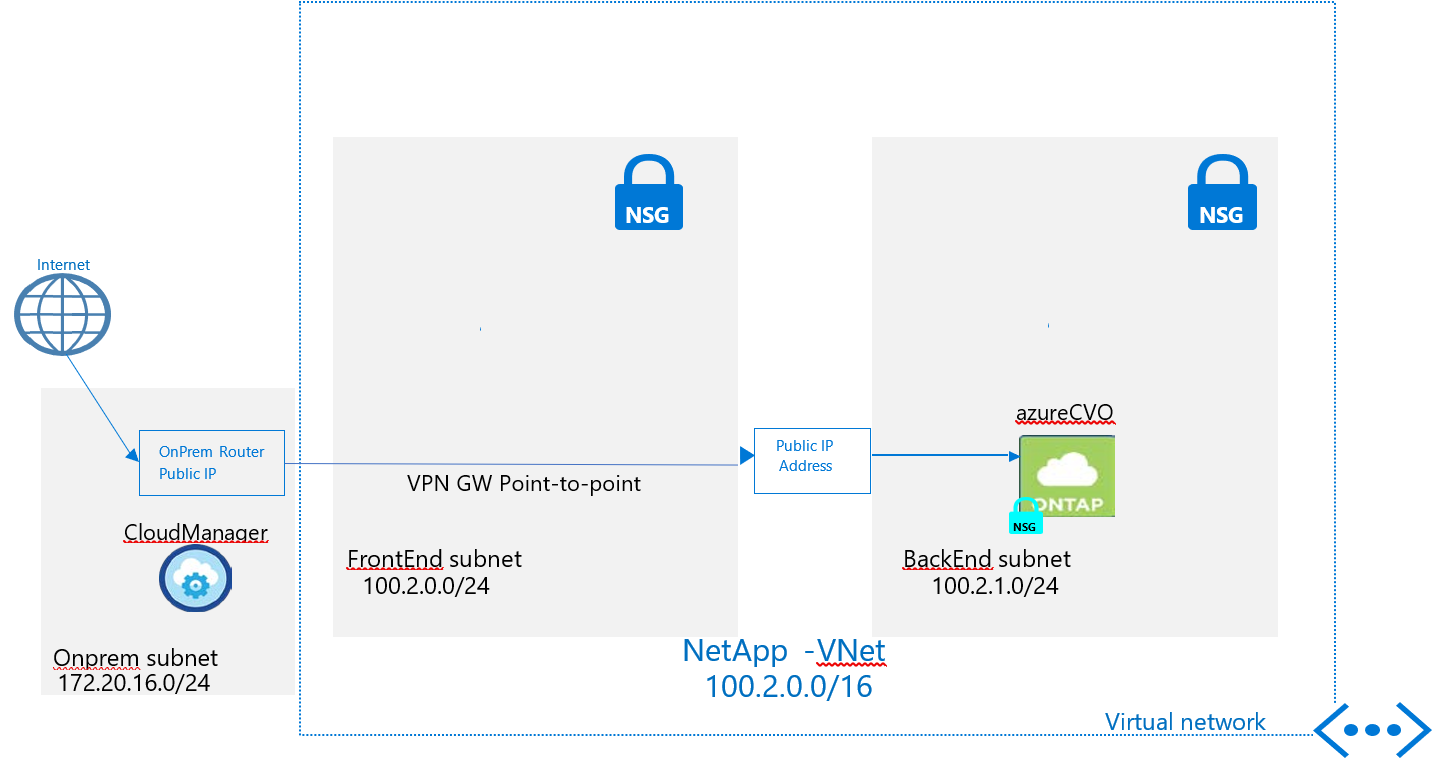
We will have the Cloud Manager installed on a Centos VM on premises. In MS Azure a VNet , subnets , Network Security Groups , Virtual Network Gateway and a site to site connection will be crated . Connection between on premises and Azure VNet will be done using Virtual Network Gateway that will have a public IP on Azure Side and Site-to-Site connection will run the public IP of the Virtual Network Gateway and the on premises router public IP.
Cloud Manager will be linked to an Netapp Cloud Account and from it we will Create a CVO, will discover existing ONTAP devices onsite and create a DR relationship from on premises to cloud ( reversed Is also possible )
Prerequisites on premises:
Single instance of Ontap Select was deployed via OVA file ( for POC purposes ) .
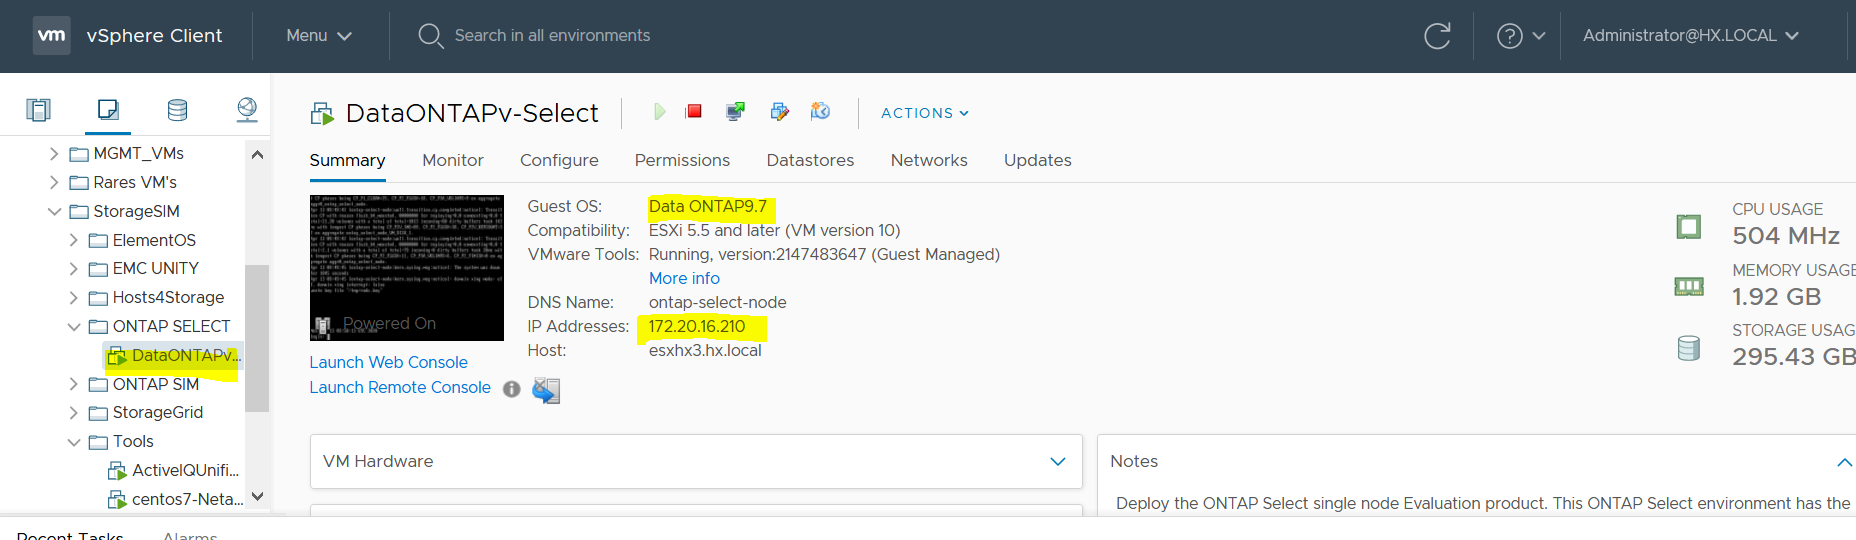
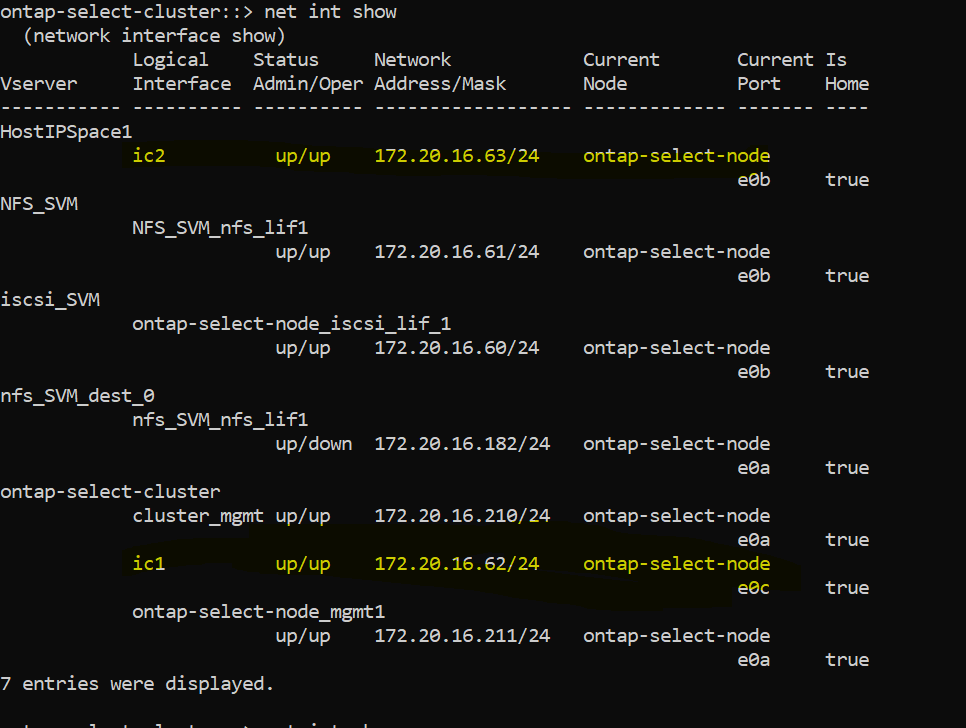
Internal Subnet 172.20.16.0/24 ; Management ip 172.20.16.210 ; intra cluster lifs were created ic1 and ic2 for cluster peering purposes .
For the replication we will need a NFS volume and a SVM .
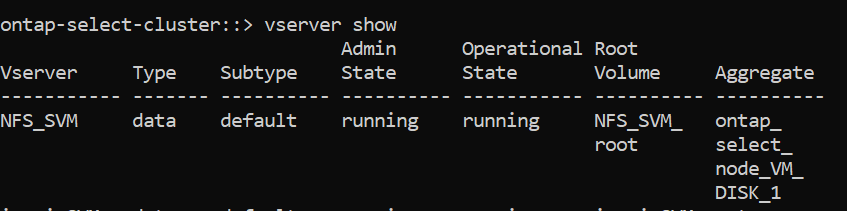
For POC NFS_SVM was created and the volume nfs_vol_to_ontap as in the following screen :

Prerequisites in Azure :
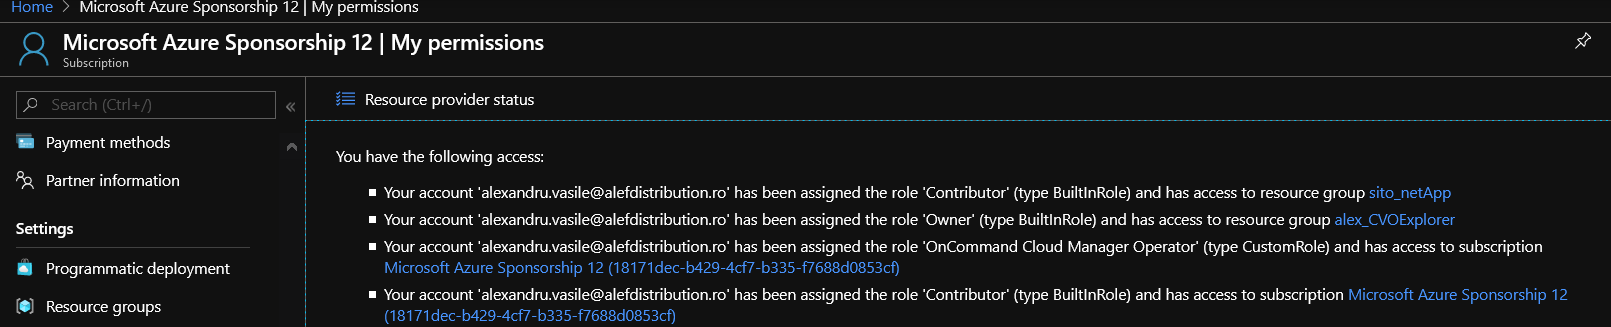
Working account in Azure ( admin rights ) .
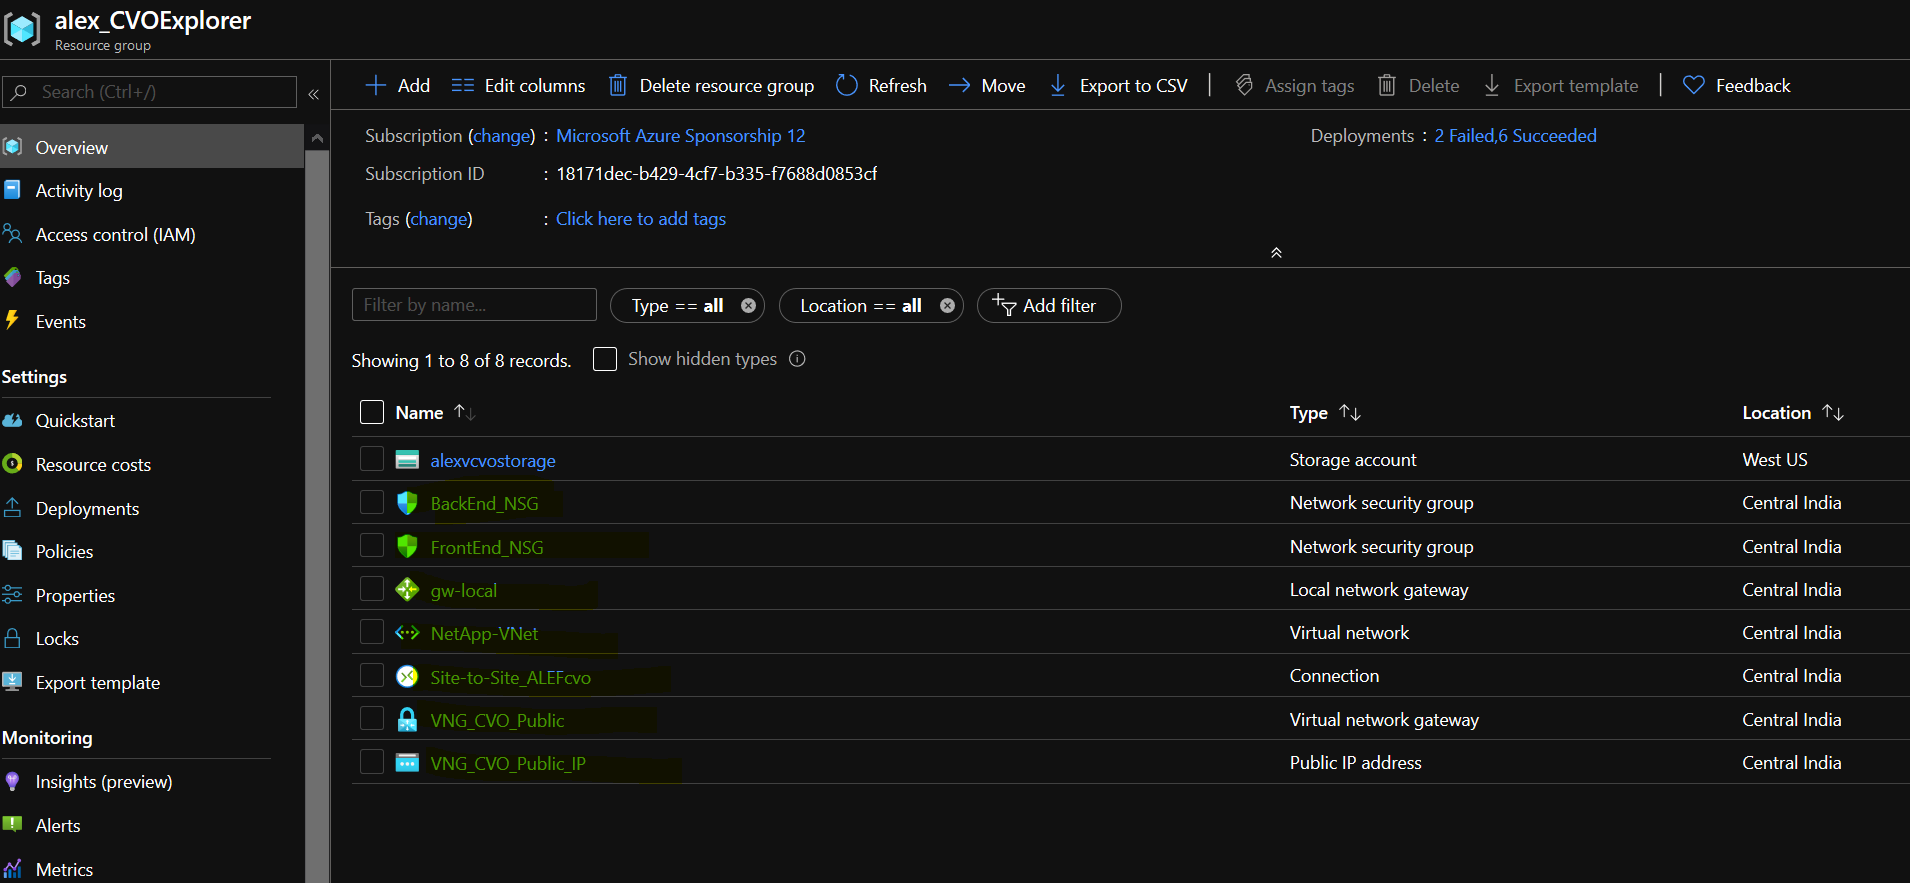
In my case I don’t have admin account I am added as contributor / owner ( type BuitInRole ) to several resource groups as below (resource group alex_CVOExporer is used for POC ):
Resource Group – in my case alex_CVOExporer
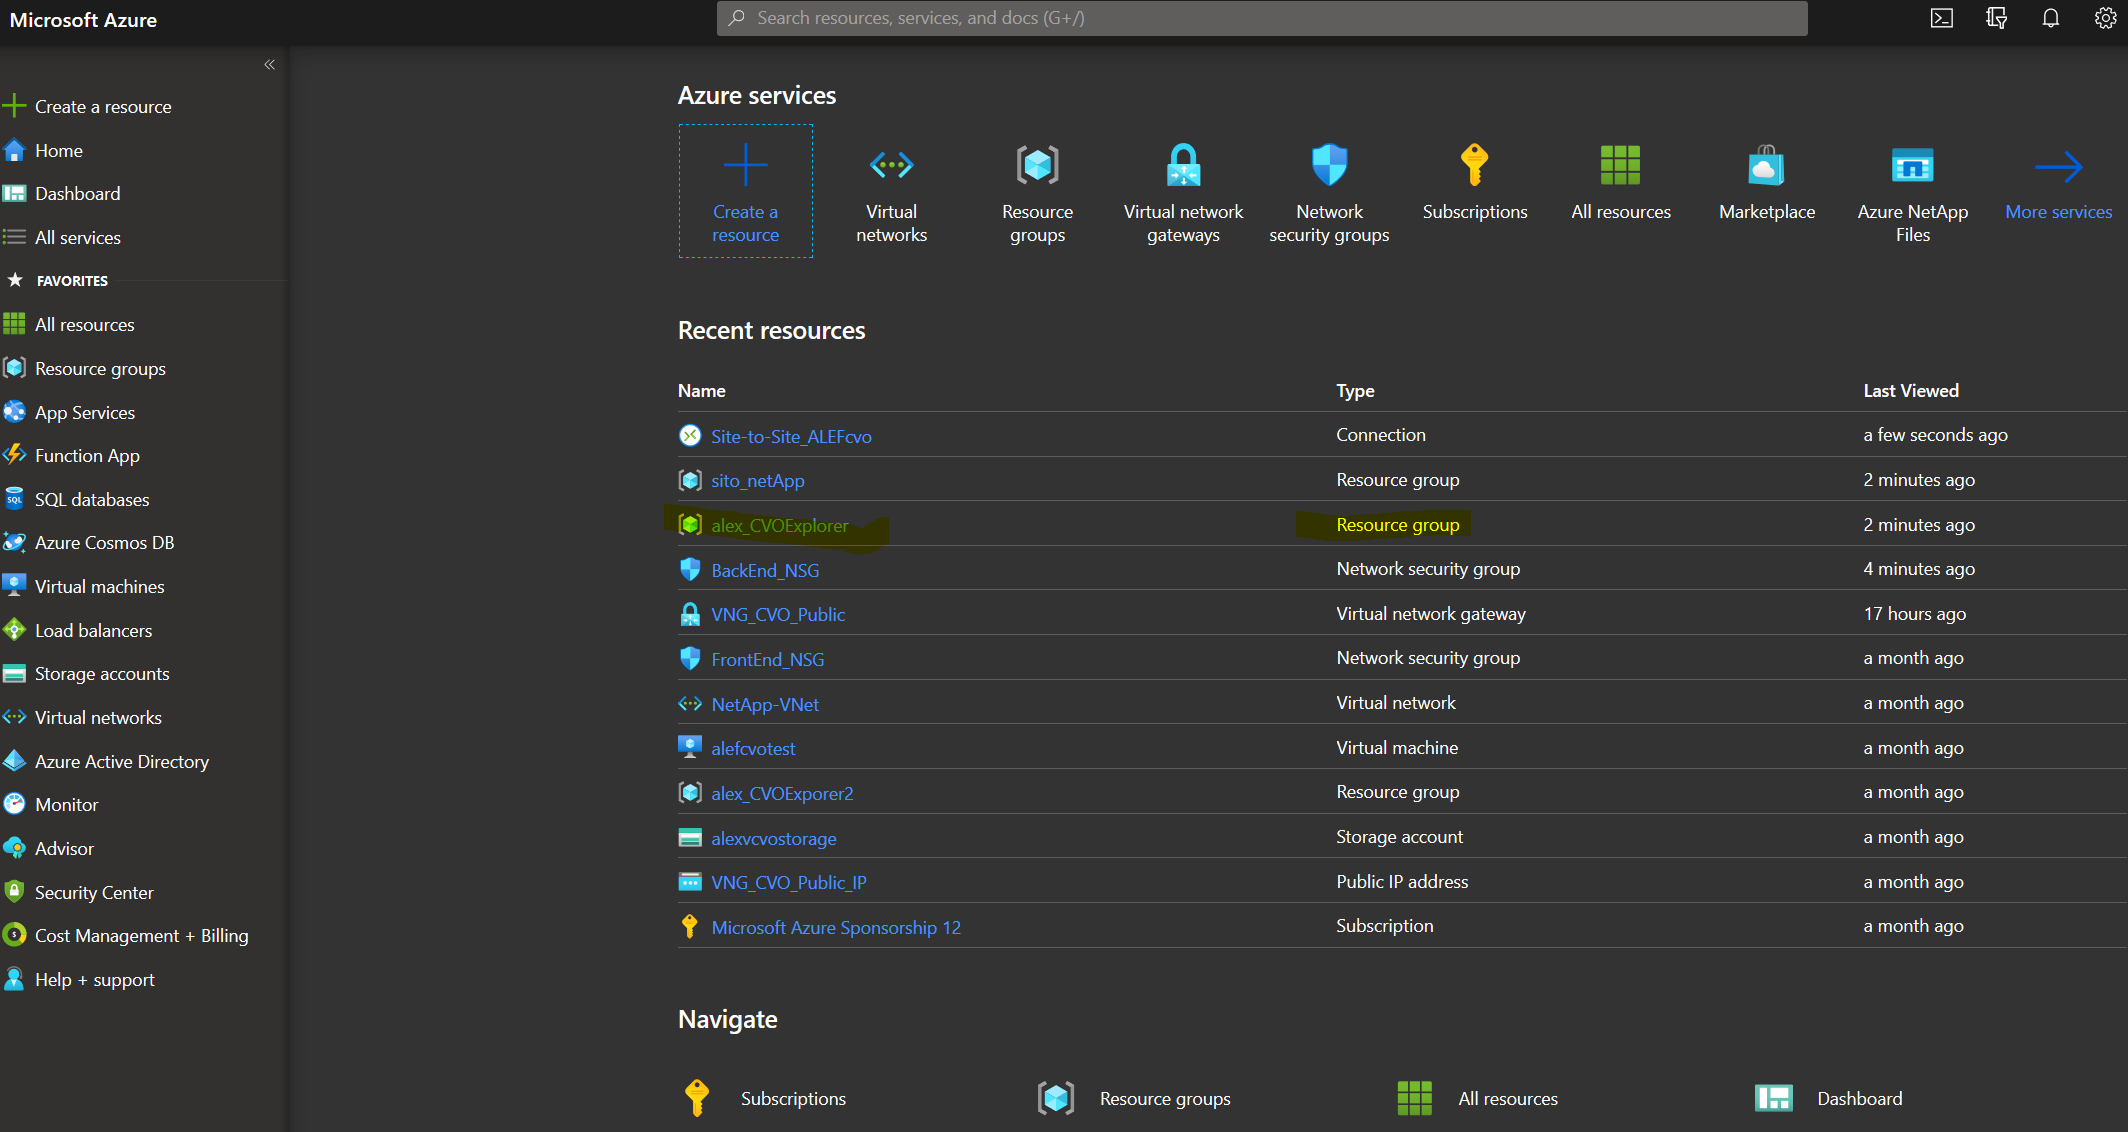
The resource group is holding the Network security groups BackEnd_NSG, FrontEnd_NSG ,gw_local , the Vnet Netapp-VNet , Stie-toSite_ALEFcvo point to point connection besides VNG_CVO_Public Virtual network Gateway and it’s Public IP VNG_CVO_Public_IP.
VNET :

VNet created with Address space 100.2.0.0/16 and it will host our Azure network side .
Going forward will list the NSG’s and the attached subnets:
Backend ( will be used as a layer of isolation for the Storage , in our case CVO ) :
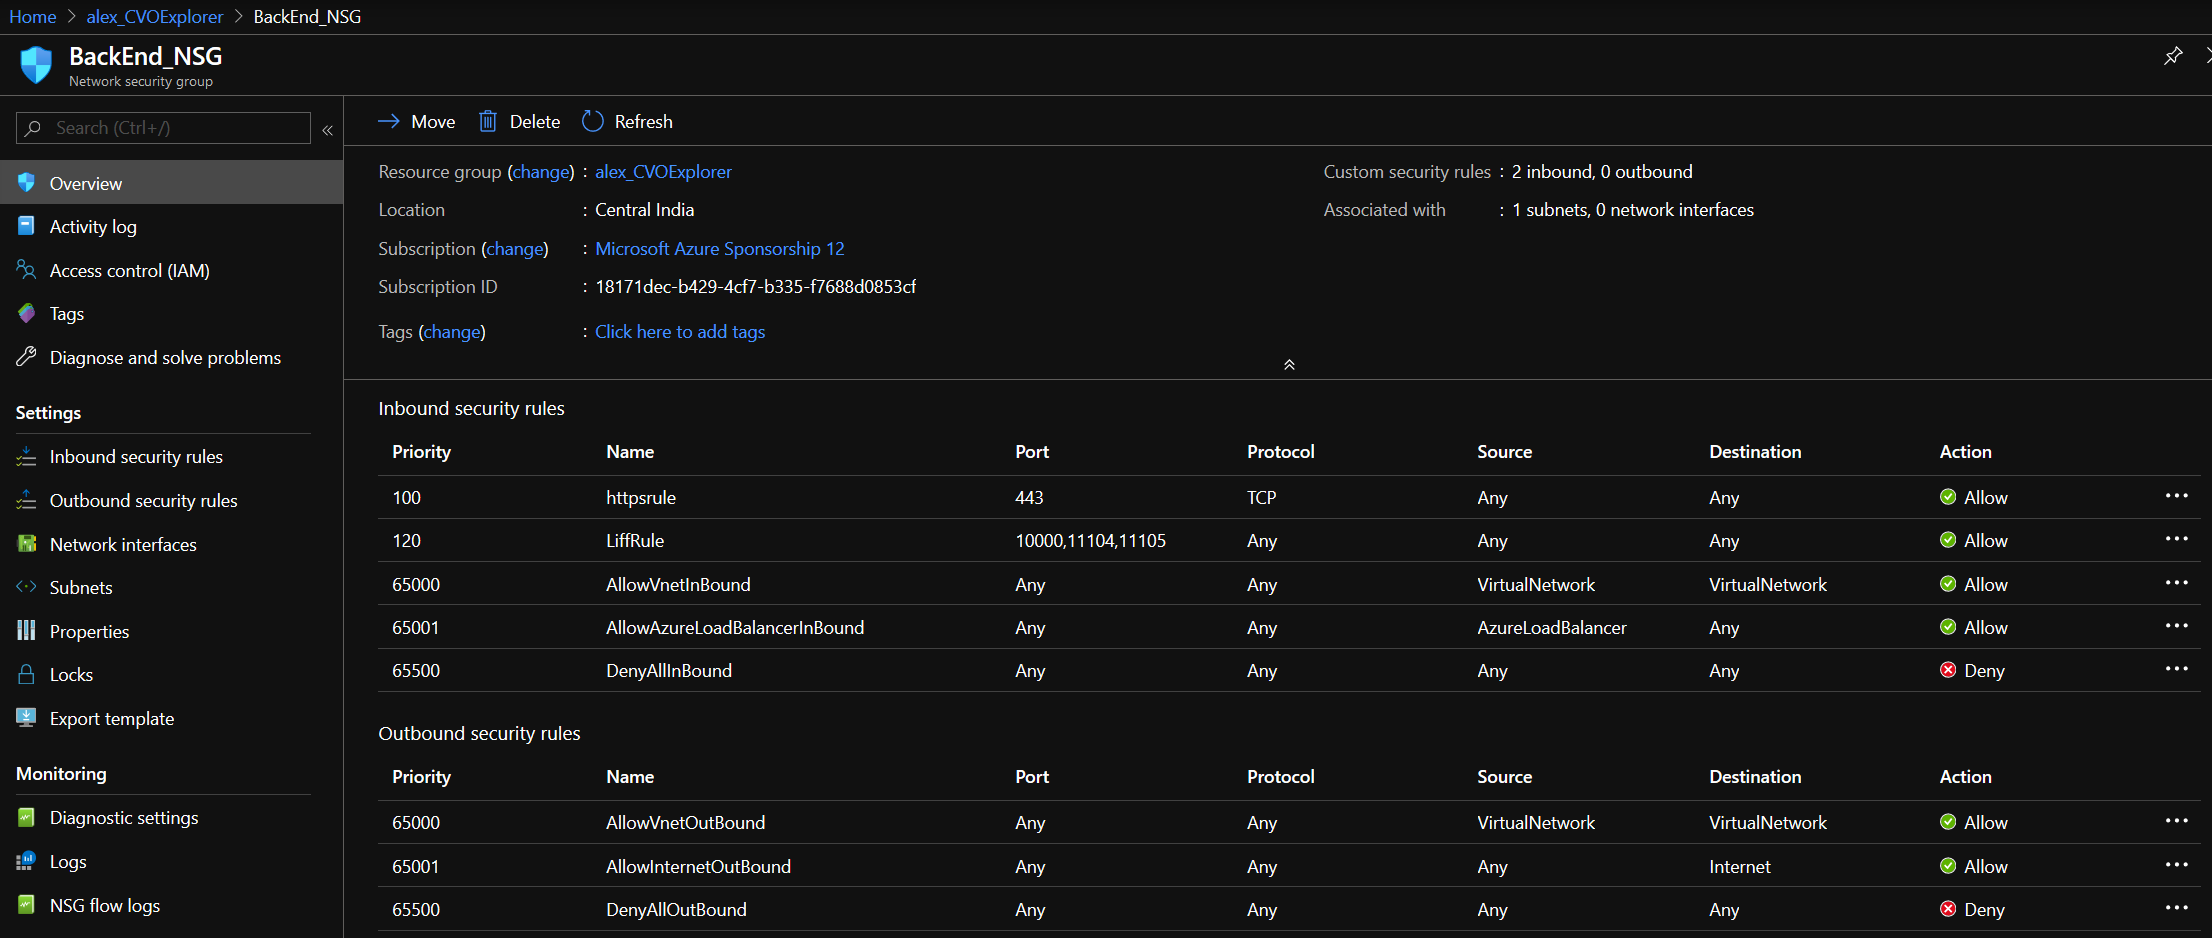
Inbound rules for ports 443 https and for lifs 10000,11104,11105

We have the range 100.2.2.0/24 for backend.
Frontend (this is actually not used for this POC , it can be used to bring up VM’s to be accessed from exterior using public IP’s or use it to install Cloud Manager in Azure from marketplace) :
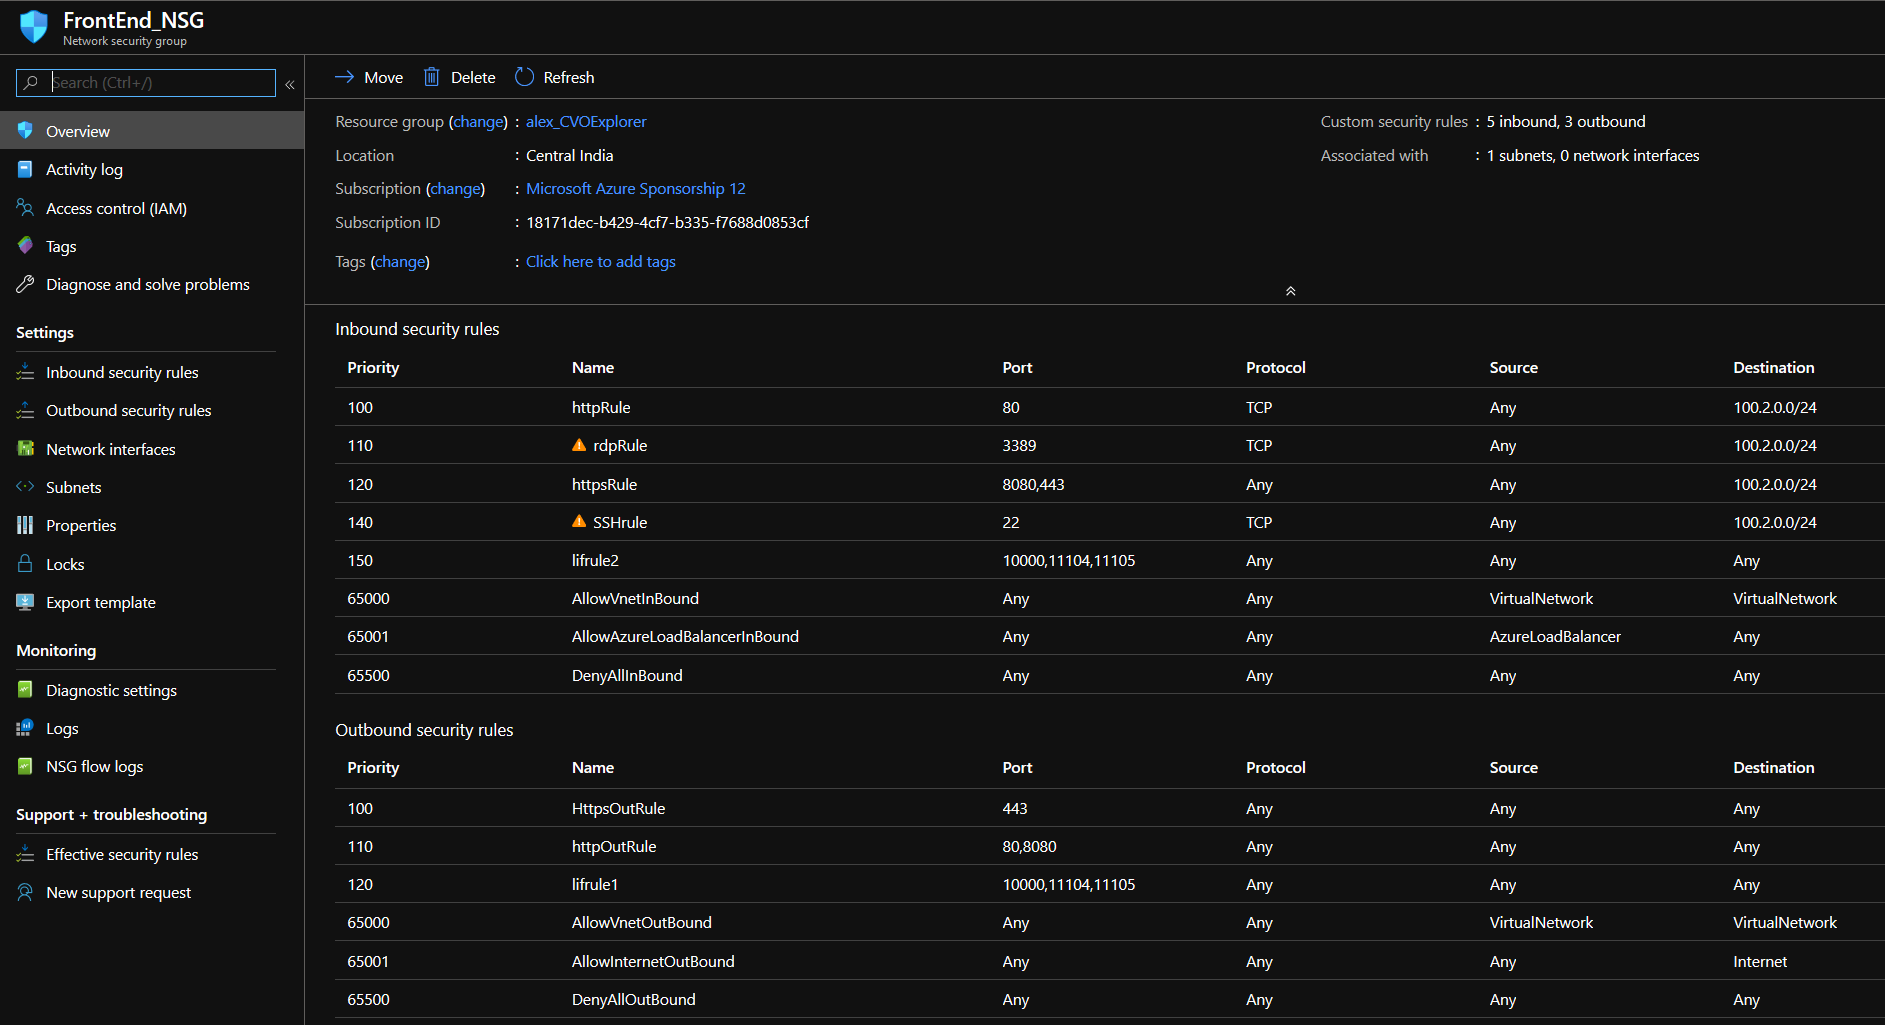
Inbound rules ports 80 http , rdp 3389, https 8080,443 lifs 10000,11104,11105 , outbound 443, https 80,8080 http lifs 10000,11104,11105

We have the range 100.2.0.0/24 for frontend
Local Gateway :
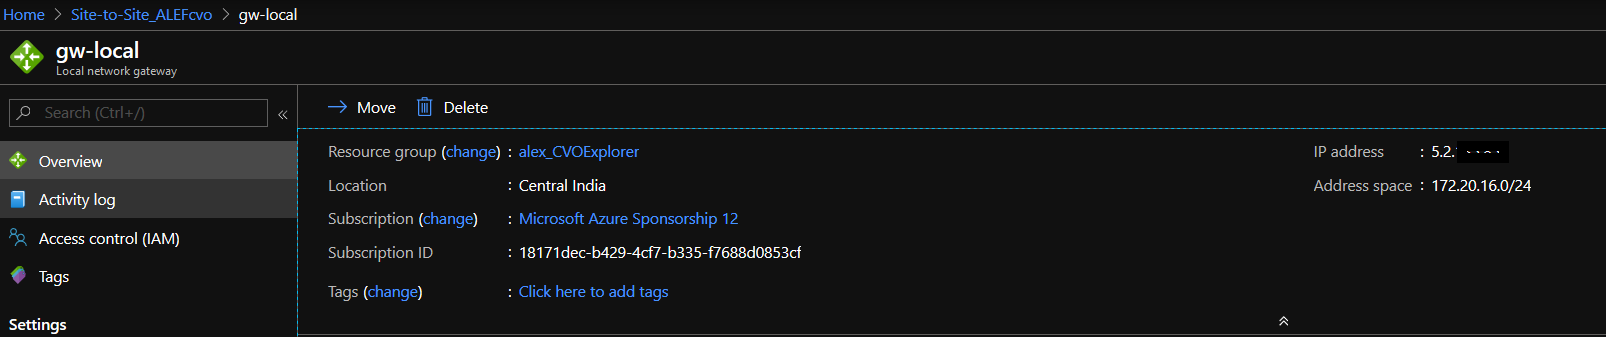
Address space is local VLAN from on premises ip range 172.20.16.0/24
Virual Network Gateway :
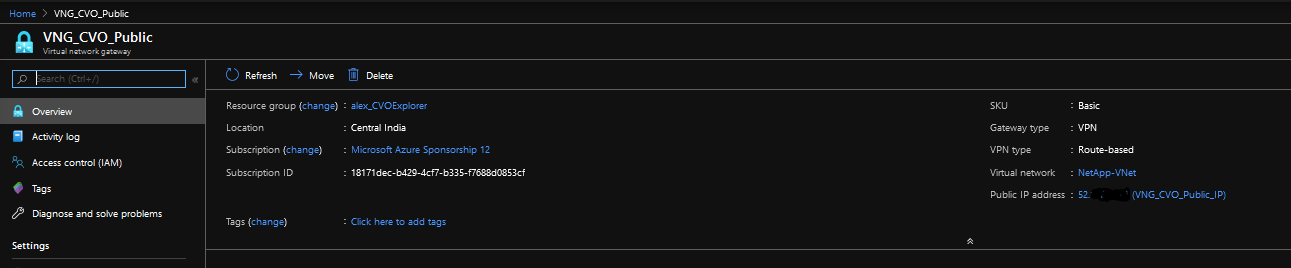
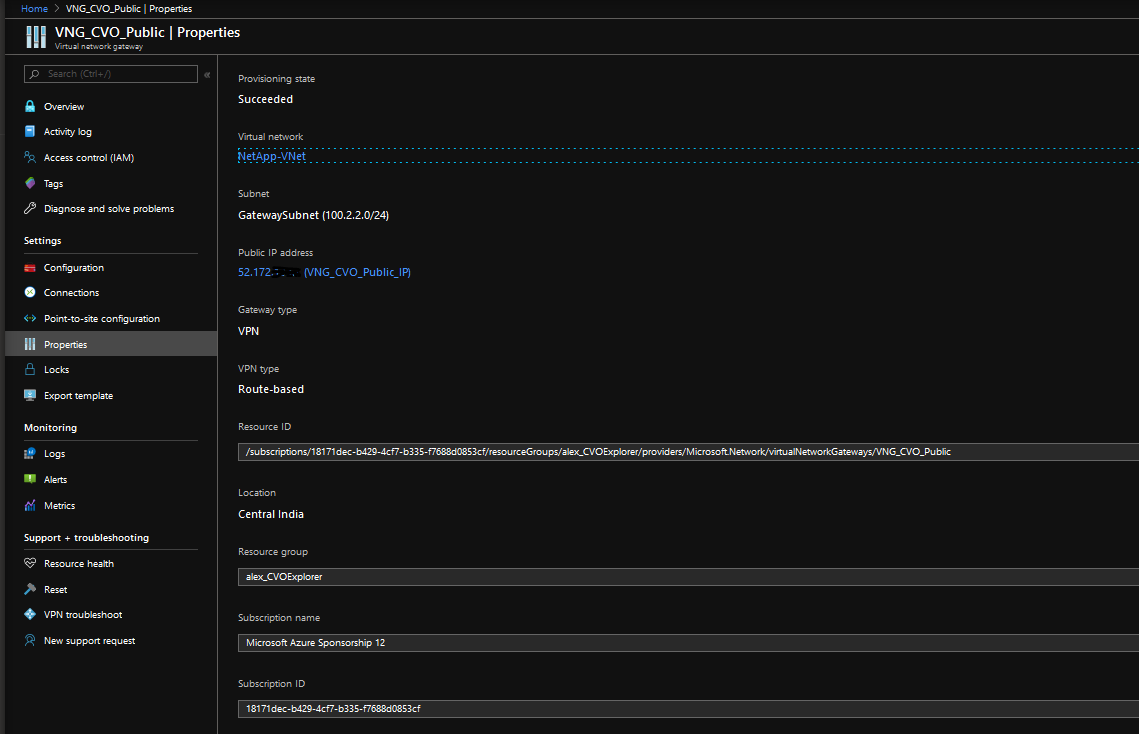
VNG was created as VPN Route-based SKU Basic Generation 1 and it was linked with the VNet ( NetApp-VNet) and it is using Gateway Subnet (100.2.2.0/24).
Connection ( Site to Site ) :
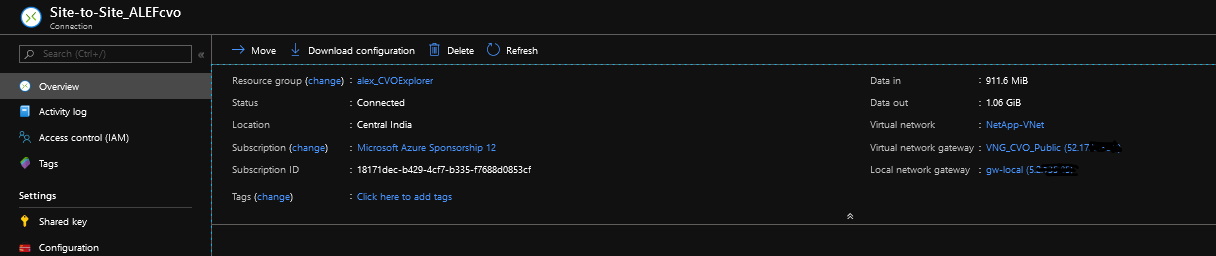
Site to site connection was created ( IPsec ) to connect Virtual network Gateway ( in our case the public ip of the VNG ) with Local network Gateway ( that is in our case the on premises router’s public ip) .
References: https://docs.microsoft.com/en-us/azure/vpn-gateway/vpn-gateway-about-compliance-crypto
https://docs.microsoft.com/en-us/azure/vpn-gateway/vpn-gateway-howto-site-to-site-classic-portal
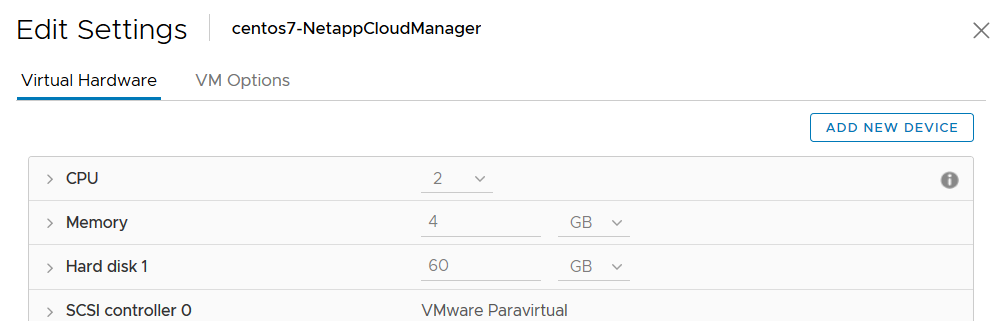
Step1 :
Deploy a Centos 7 VM ; 2 CPU’s 4Gb of Ram and a 60Gb Drive.
Step2 : Download and install the Cloud Manager in the VM deployed on Step1.
Download links for onprem Cloud Manager : https://mysupport.netapp.com/site/products/all/details/cloud-manager/downloads-tab
Verify that the service occm is running :
[root@netappcm tmp]# systemctl status occm.service
● occm.service - OCCM
Loaded: loaded (/usr/lib/systemd/system/occm.service; enabled; vendor preset: disabled)
Active: active (running) since Thu 2020-05-14 17:57:01 EEST; 16min ago
Step3 :
Access the https:\\/occmui
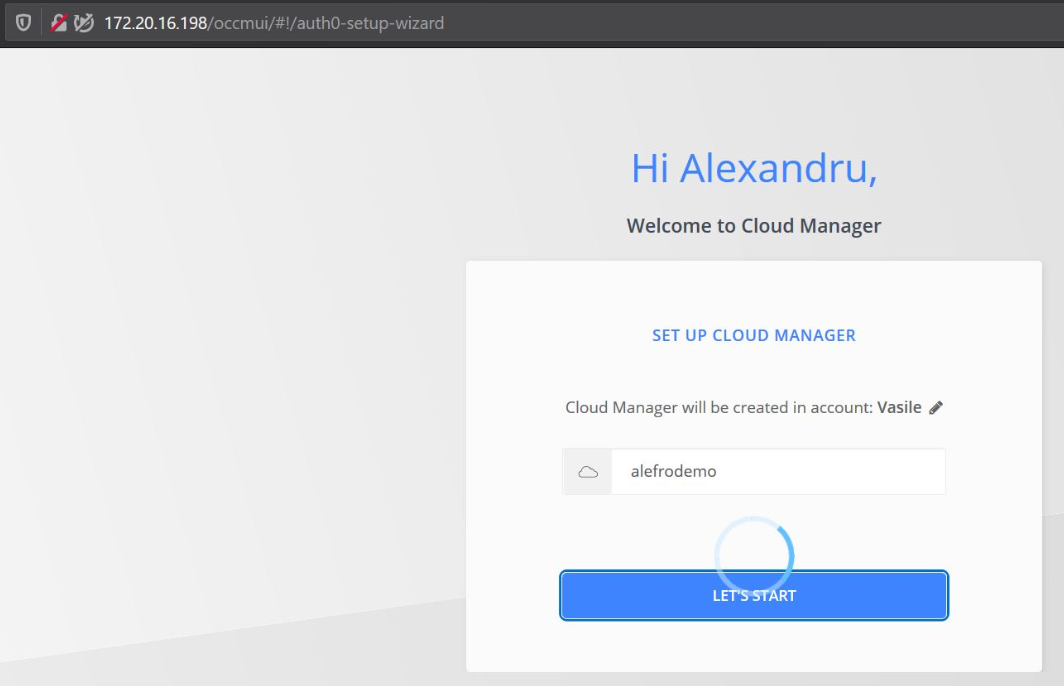
Set a name to the Cloud Manager ; The setup will register this instance also under https://services.cloud.netapp.com/cloud-managers
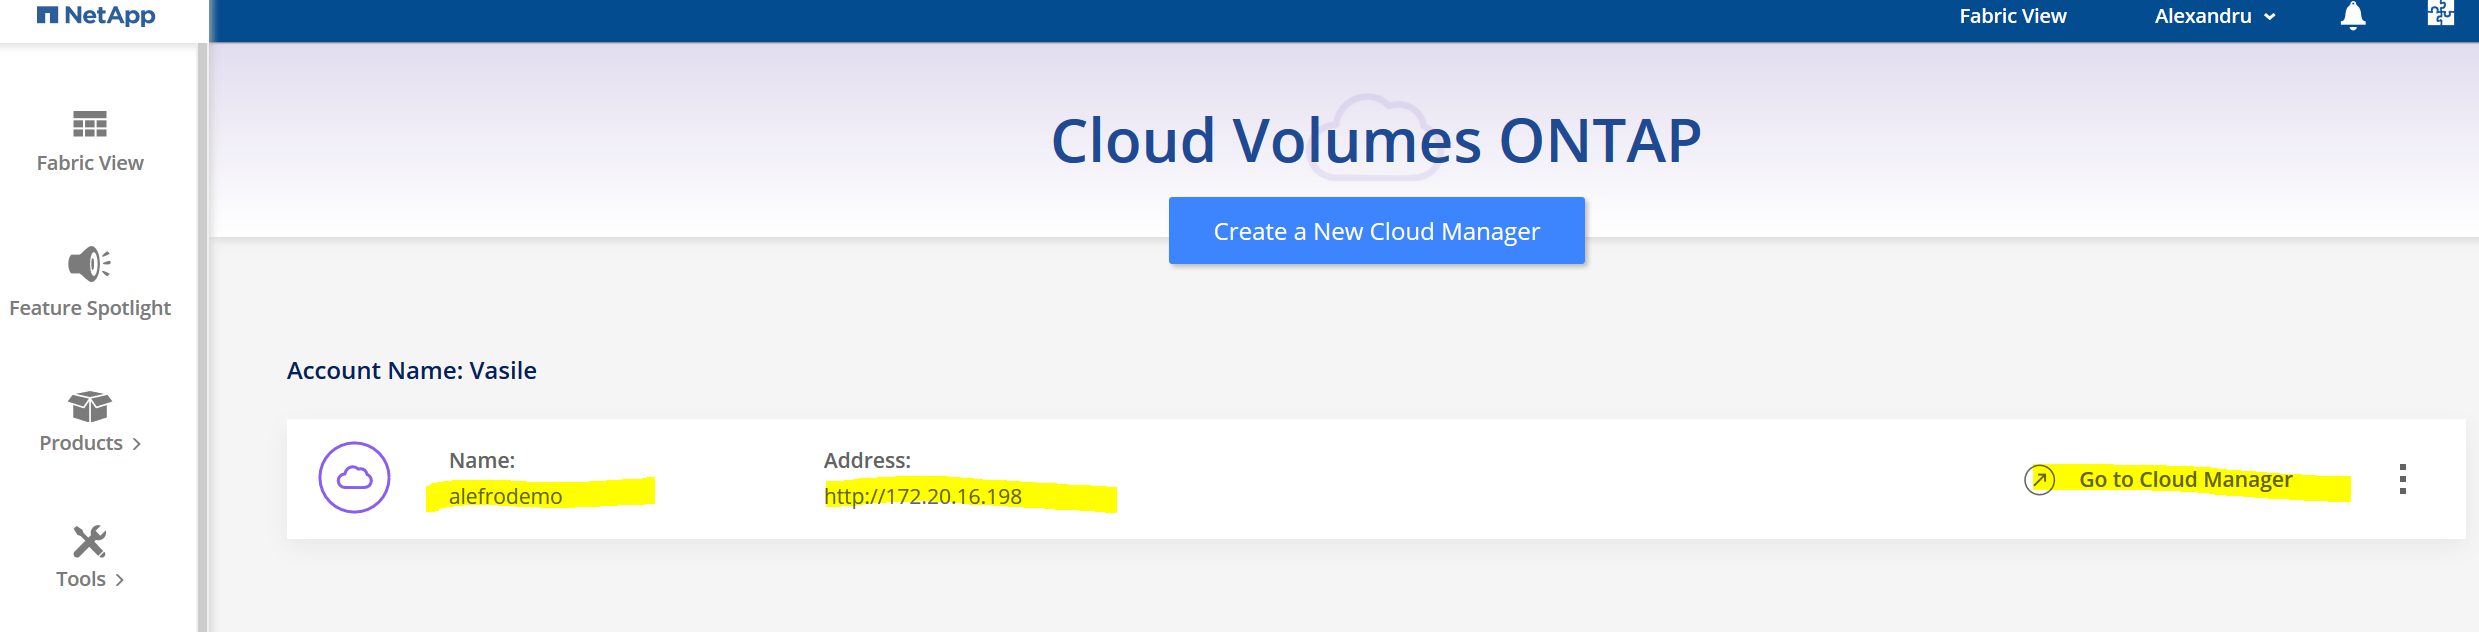
Now press the link “Go to Cloud Manager”
An update screen will appear if there is a new version .
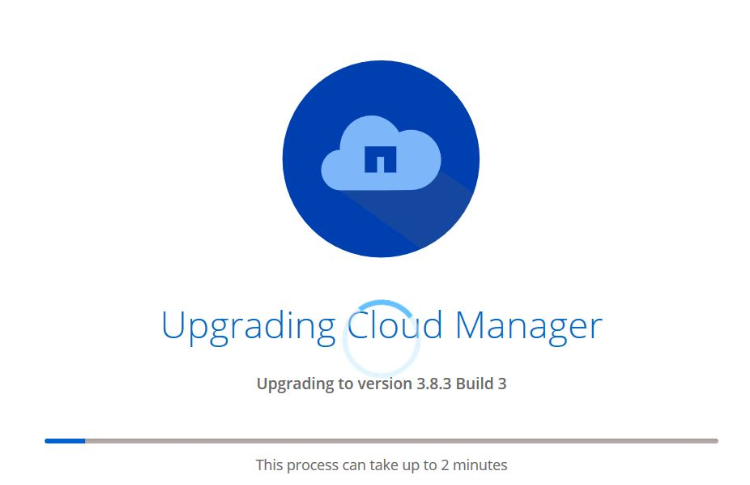
After the update Cloud Manager is available:
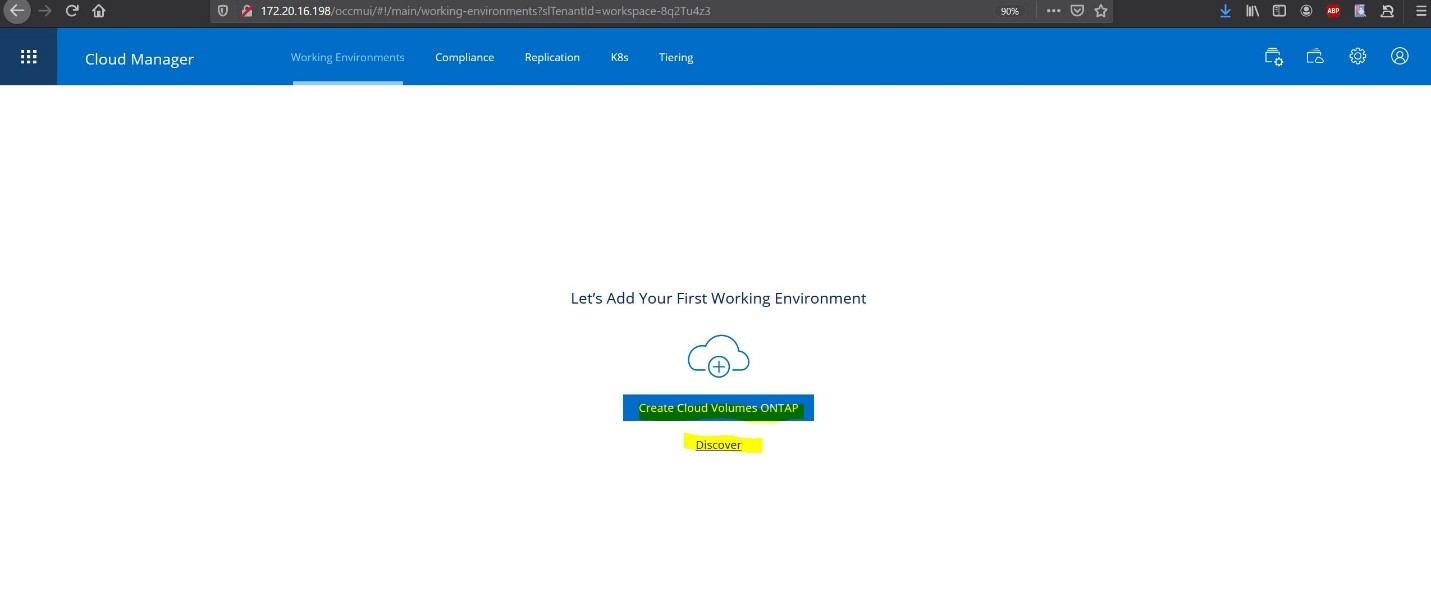
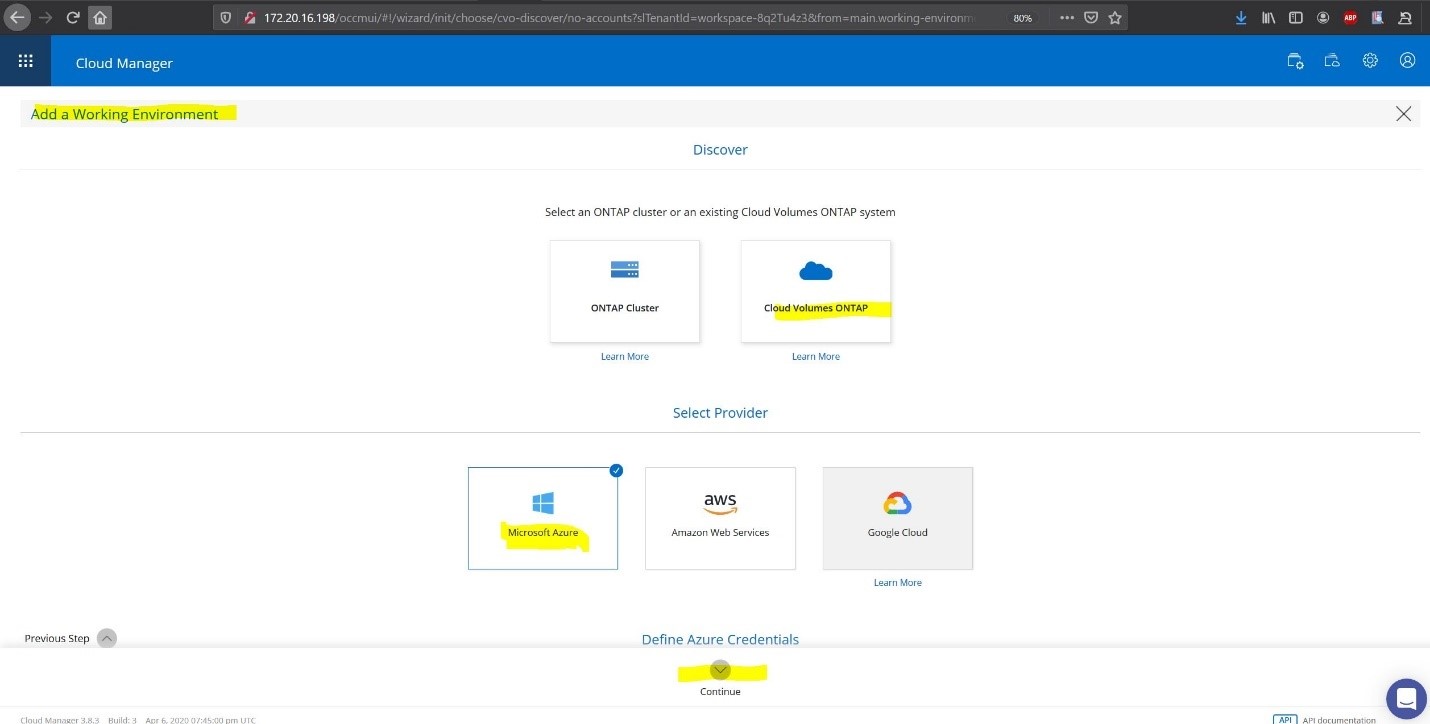
There are 2 options to Create an CVO or to discover already created CVO or on premises ONTAP based devices.
Step 4 :
Discover On Premises ONTAP device: Select > Discover
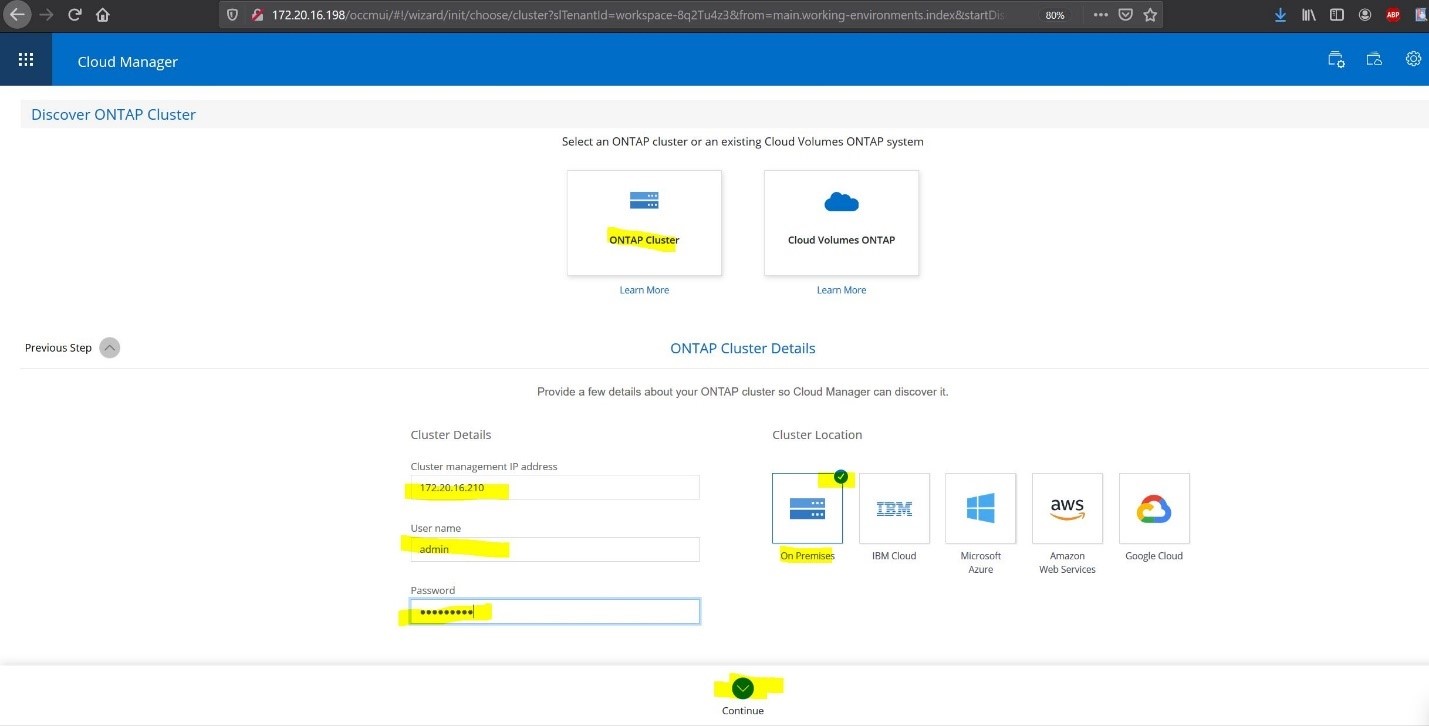
Now Select ONTAP Cluster and input IP , user , password and Cluster Location > Continue
NOTE : that a Point to point VPN must be created between On premises and Azure ; Please check the Prerequisites .
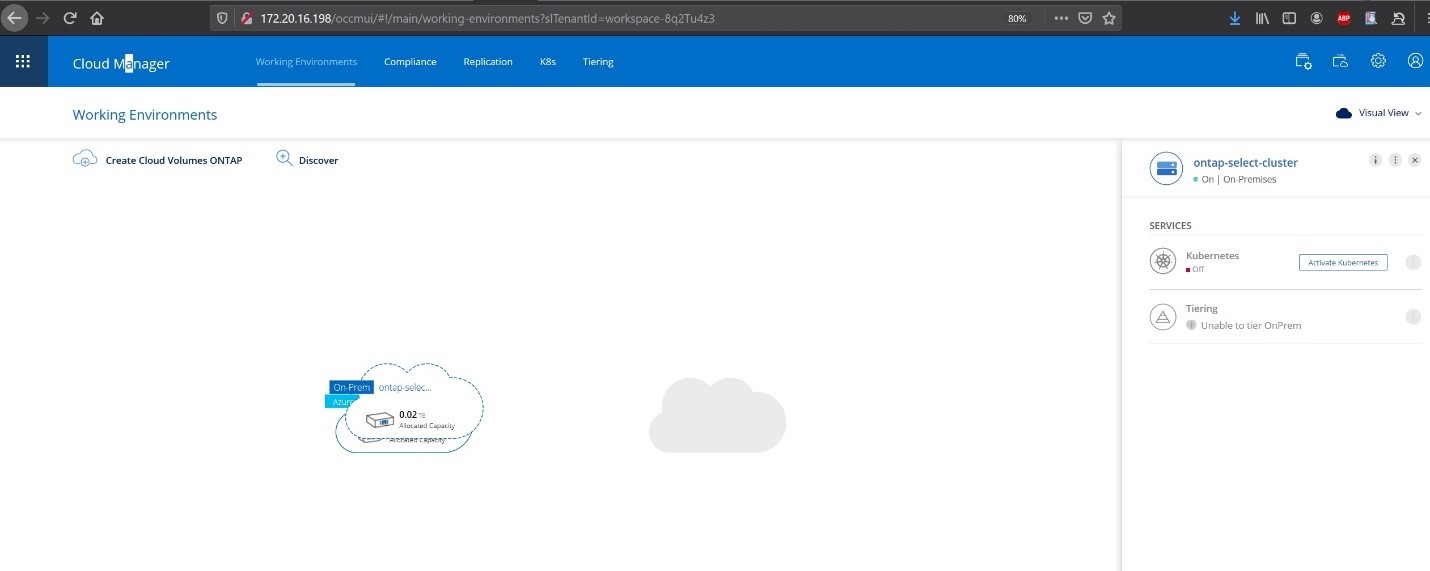
Now a Working environment Detail screen will show up with the ONTAP device name ( in the above case it is the ONTAP-select-cluster.
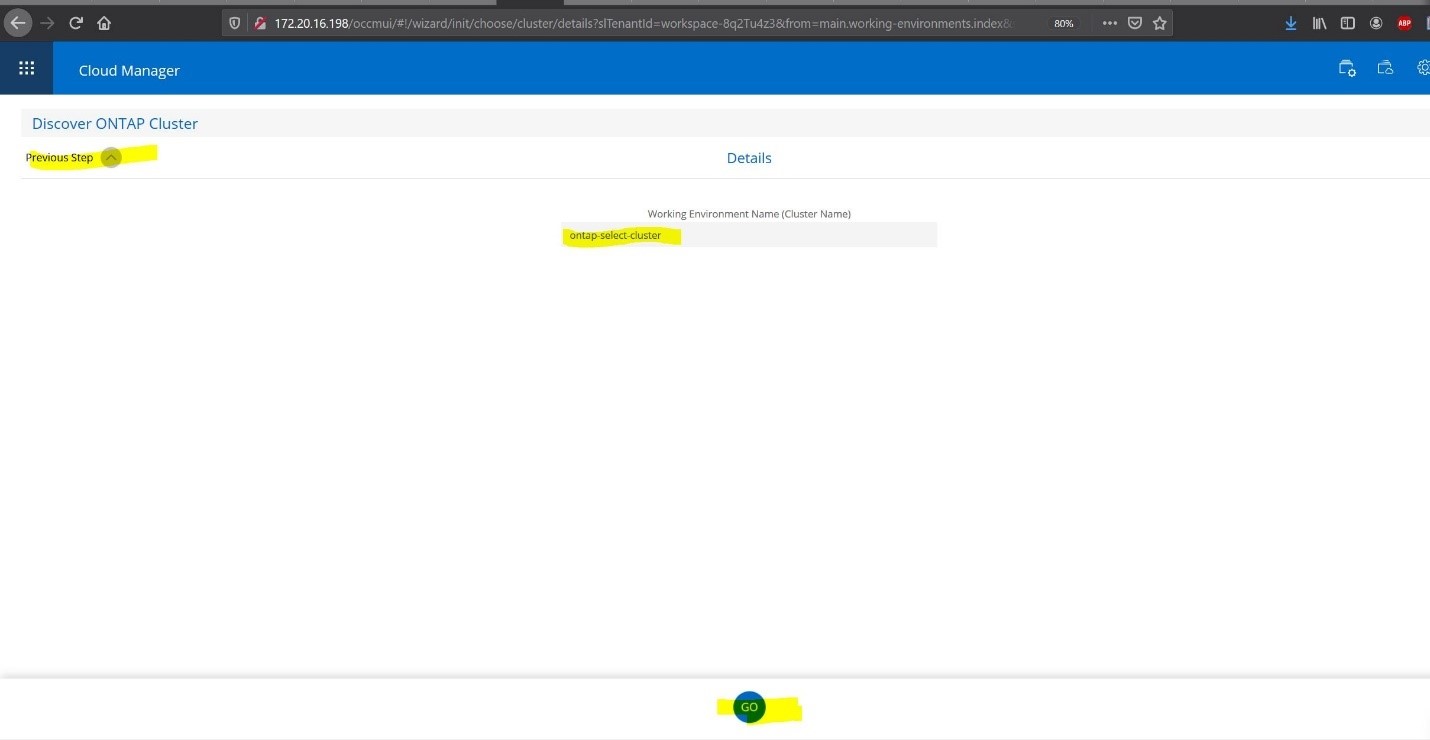
Press GO .
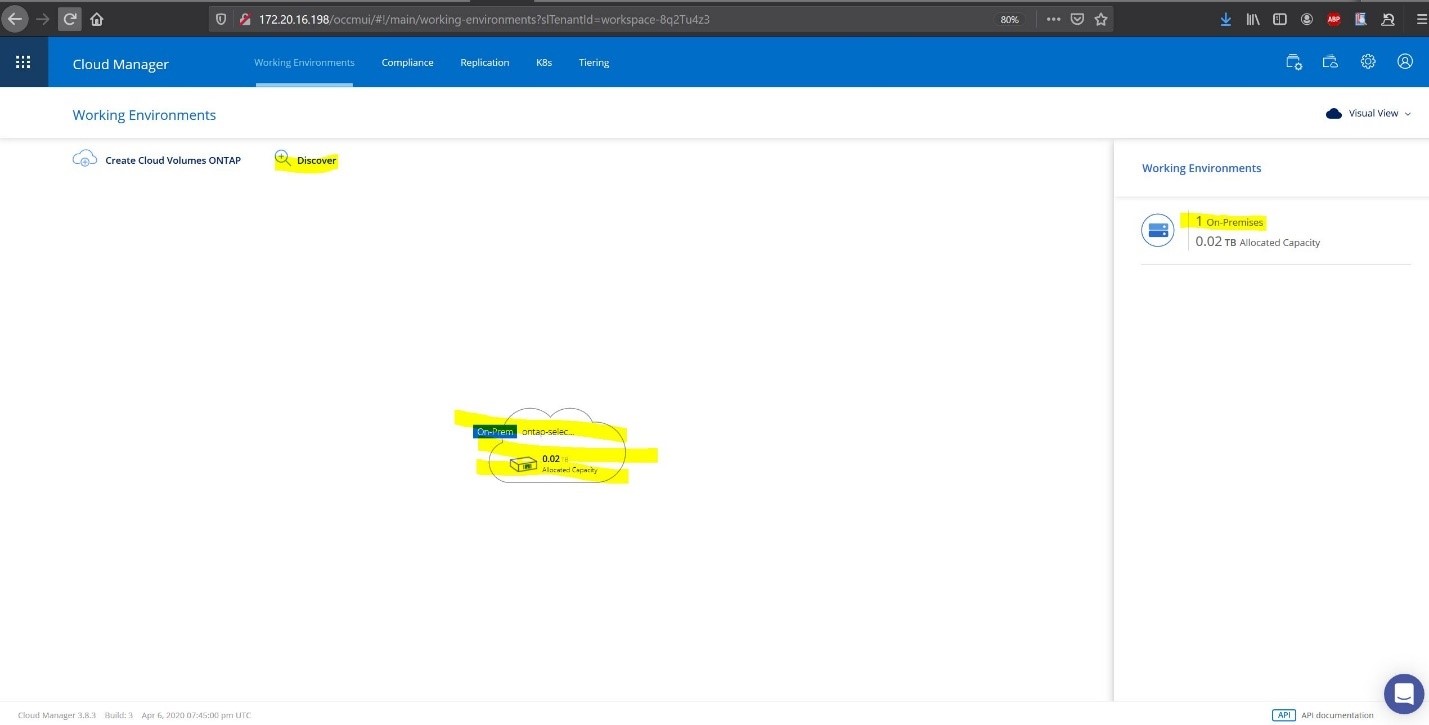
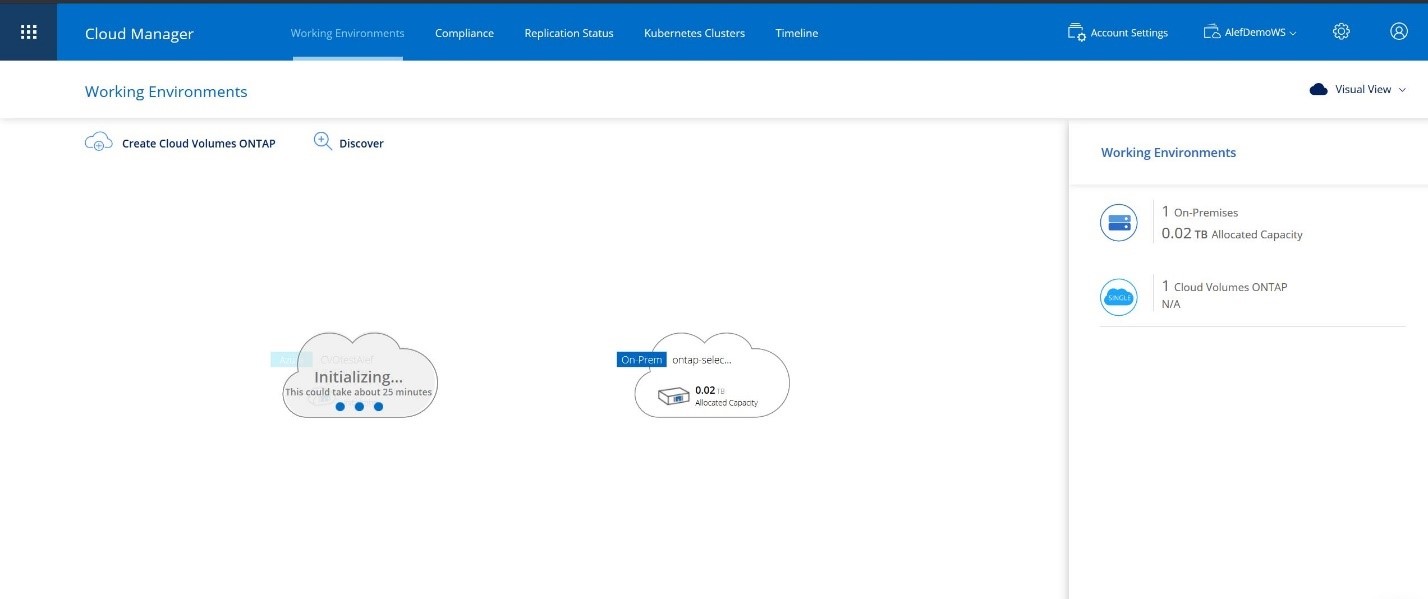
Device will be added:
Step 5A: Create a new working environment > Deploy CVO.
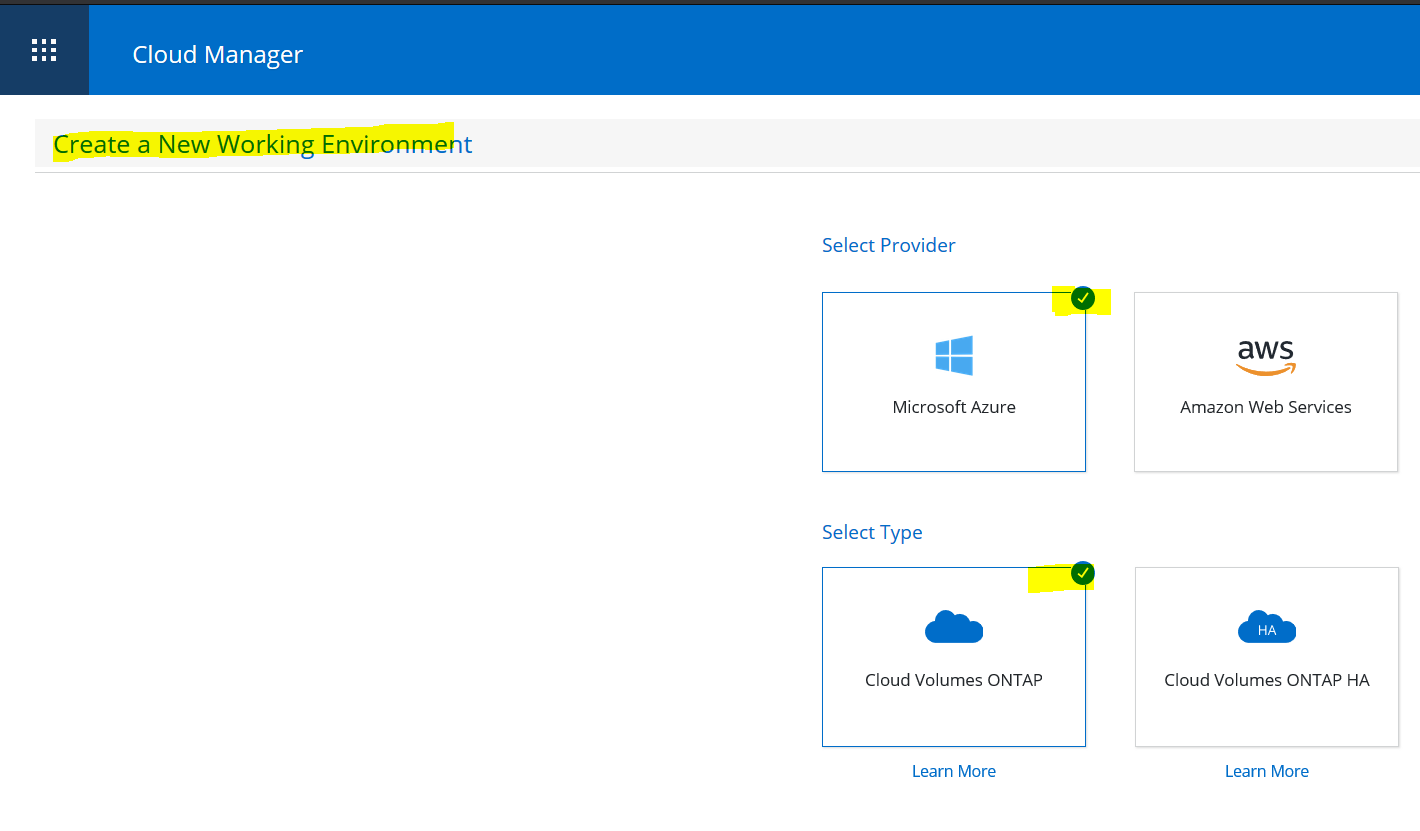
Select Azure > CVO ; below define MS Azure Account details : > Continue

Input the required credentials client ID , tenant and Secret ( Reference : https://community.microfocus.com/t5/Identity-Manager-Tips/Creating-the-application-Client-ID-and-Client-Secret-from/ta-p/1776619 )
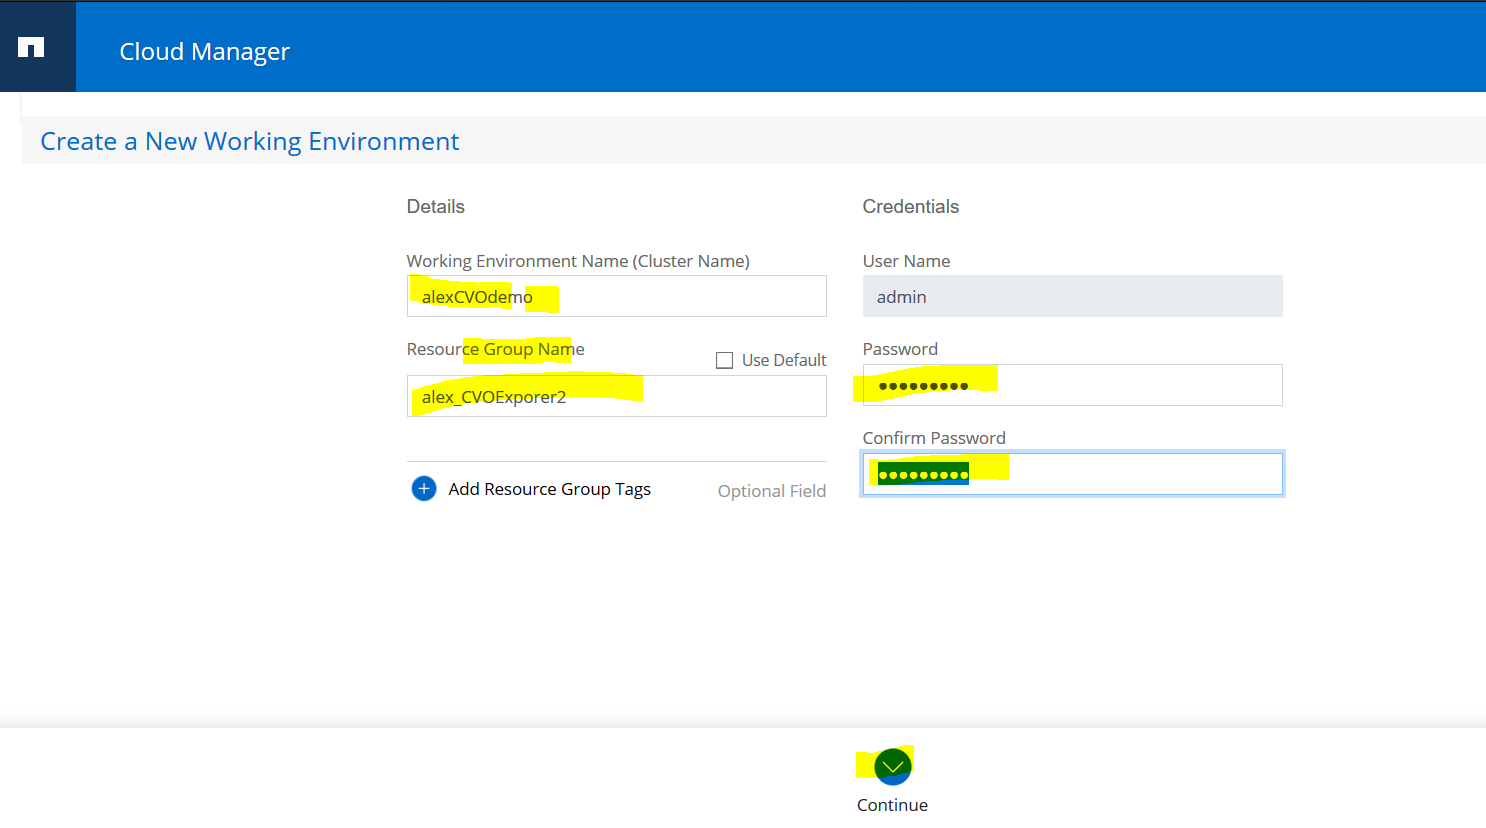
In the next screen we define Working environment name ( CVO cluster name ) , Resource Group Name , user and password for this CVO > Continue .
Now Create a Volume :
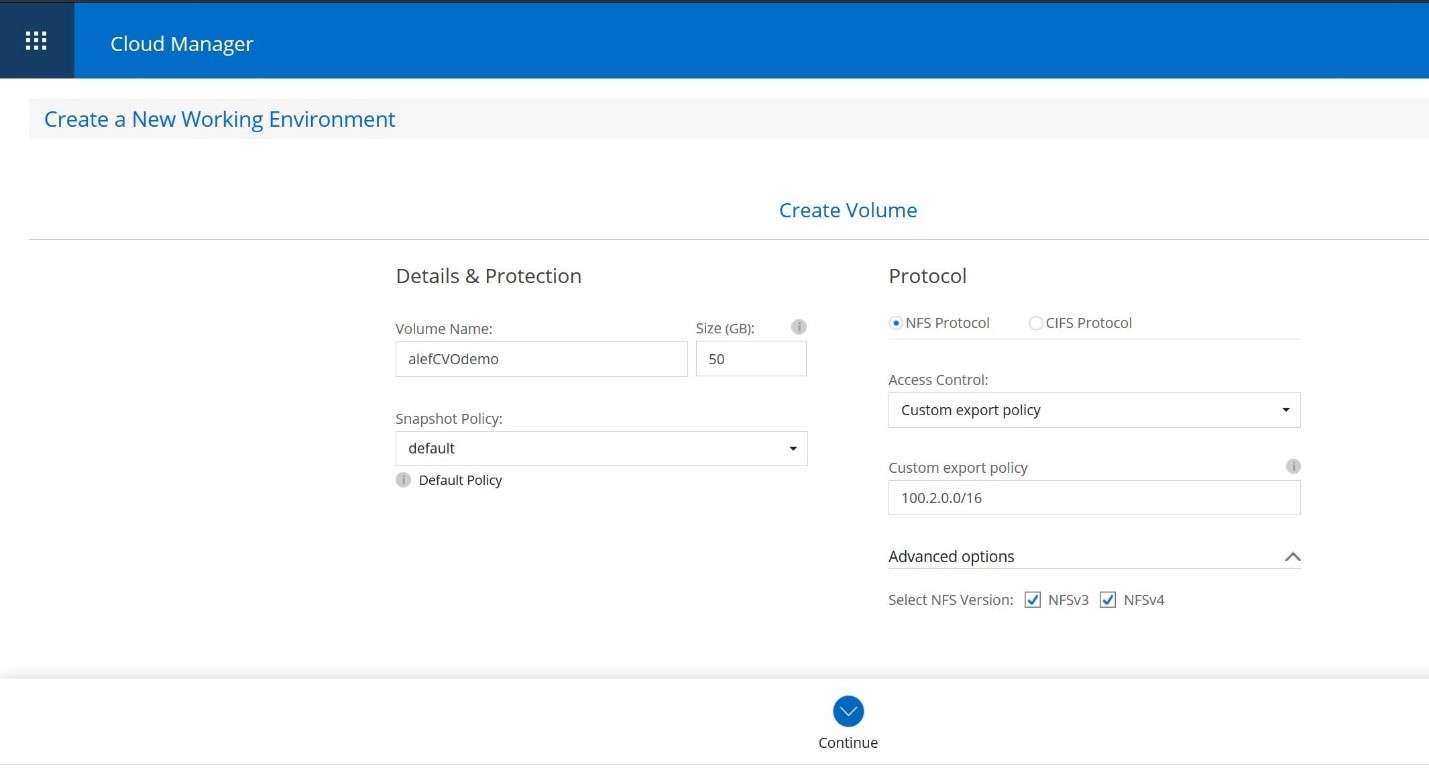
Selected 50Gb NFS and Custom export policy in 100.2.0.0/16 Subnet. > Continue.
Location & Connectivity
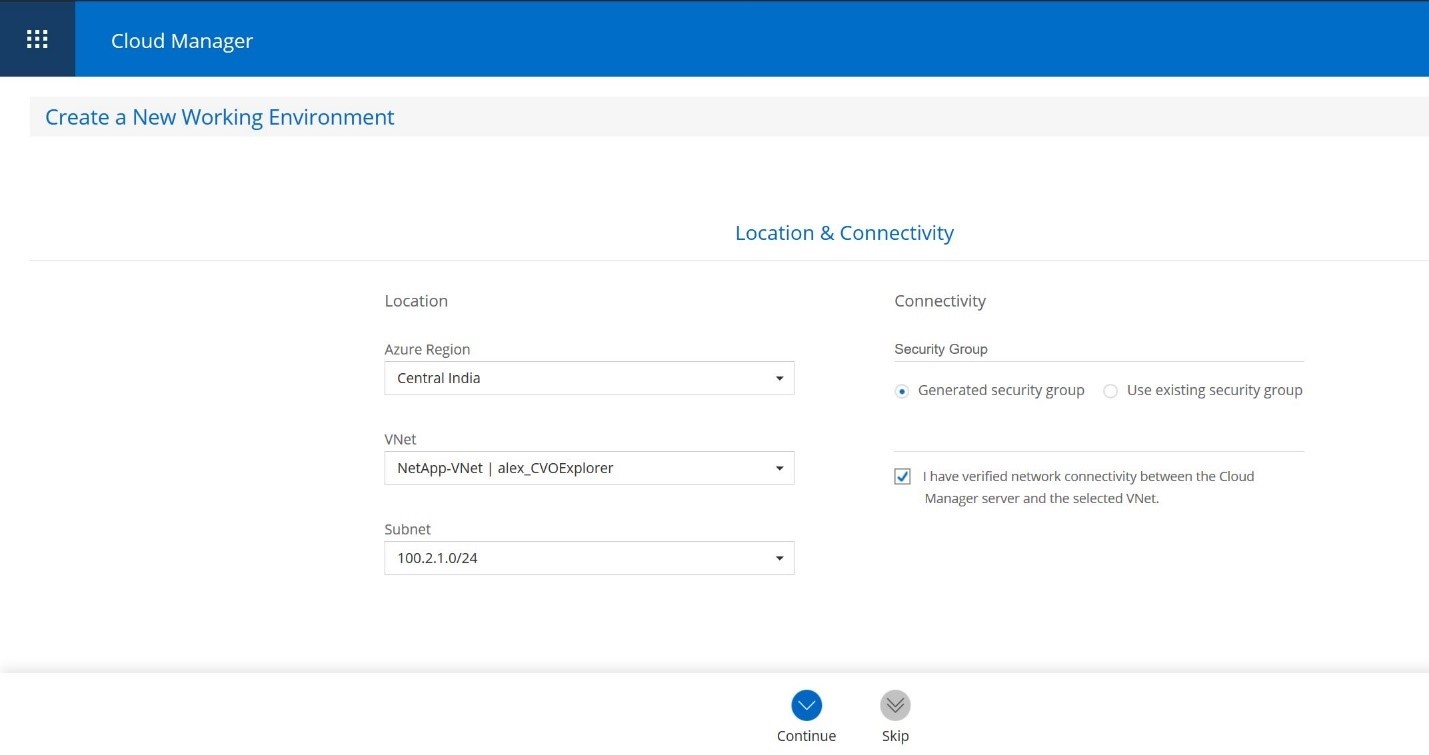
Selected Azure Region Central India ; Vnet Netapp-VNet | Alex_CVOExplorer ; Subnet 100.2.1.0/24. > Continue.
CVO License:
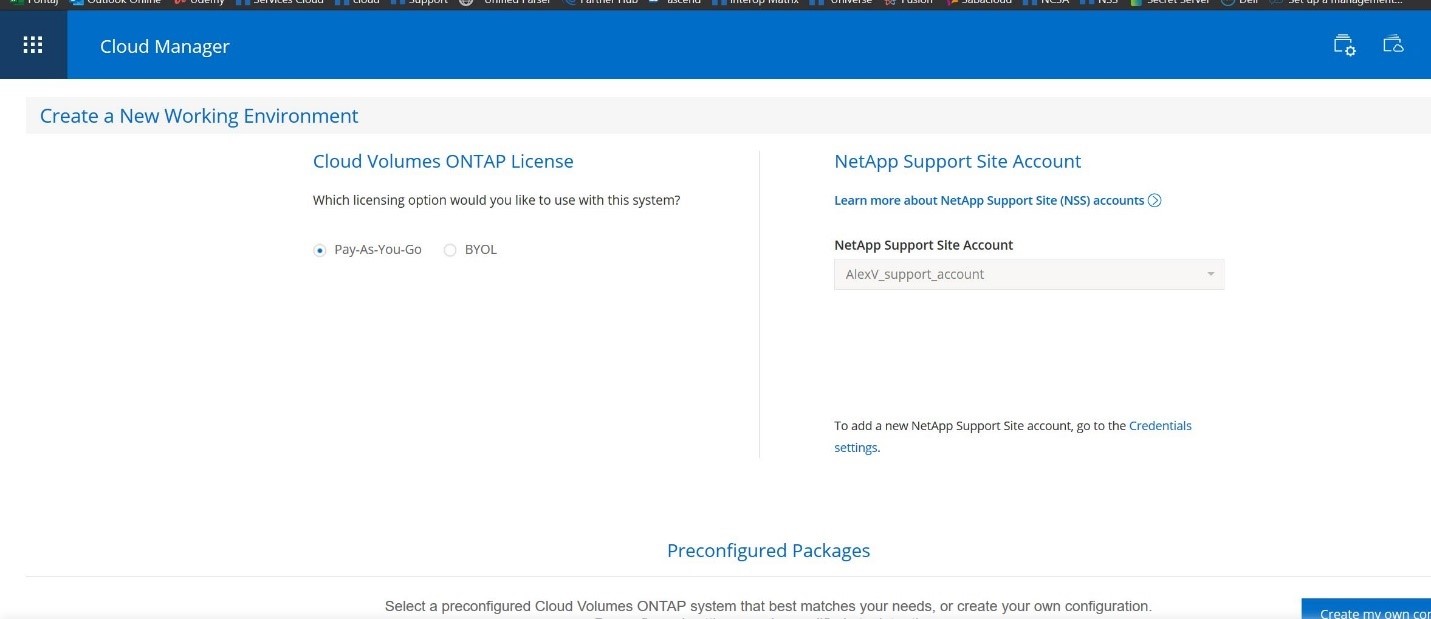
Selected Pay-AS-You-Go > Continue
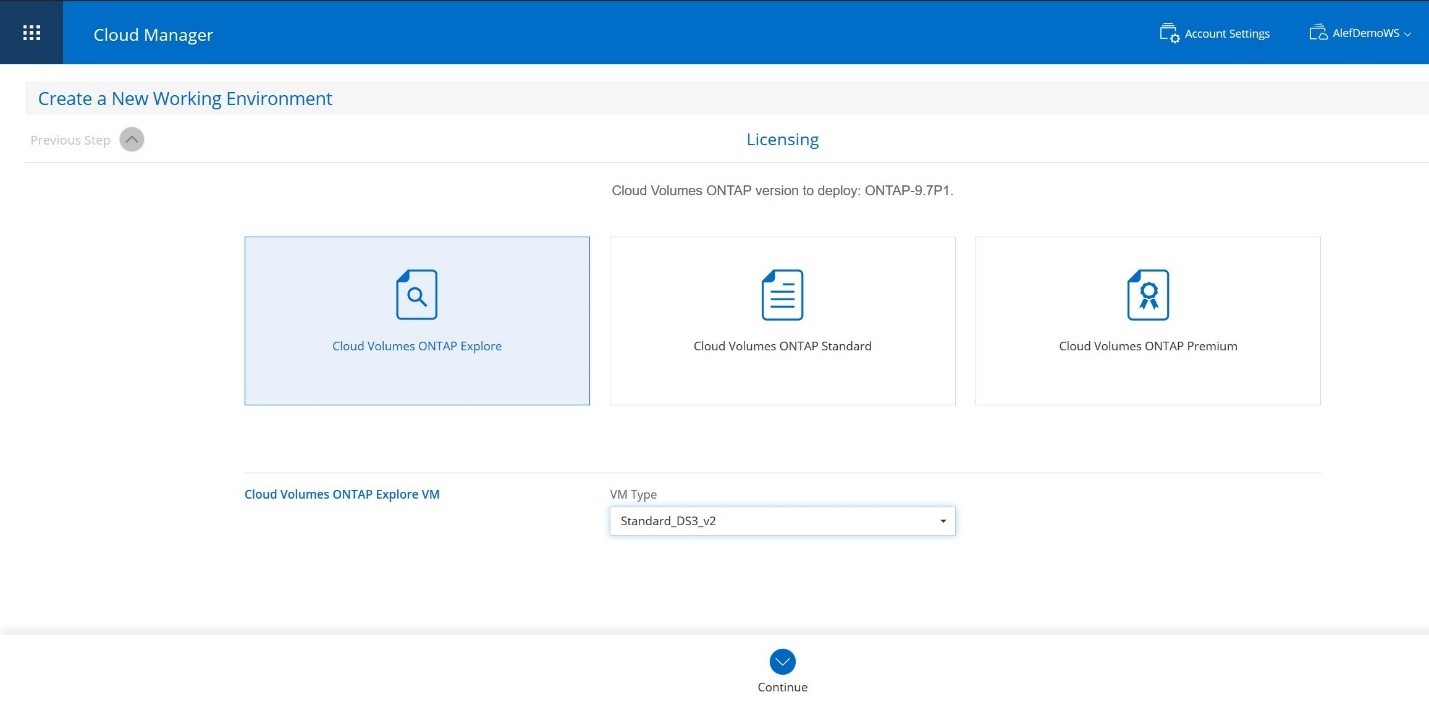
Further selected CVO Volume ONTAP Explore and Standard_DS3_v2 ( that is perfect for POC purposes ) . > Continue.
Underlying Storage Resources :
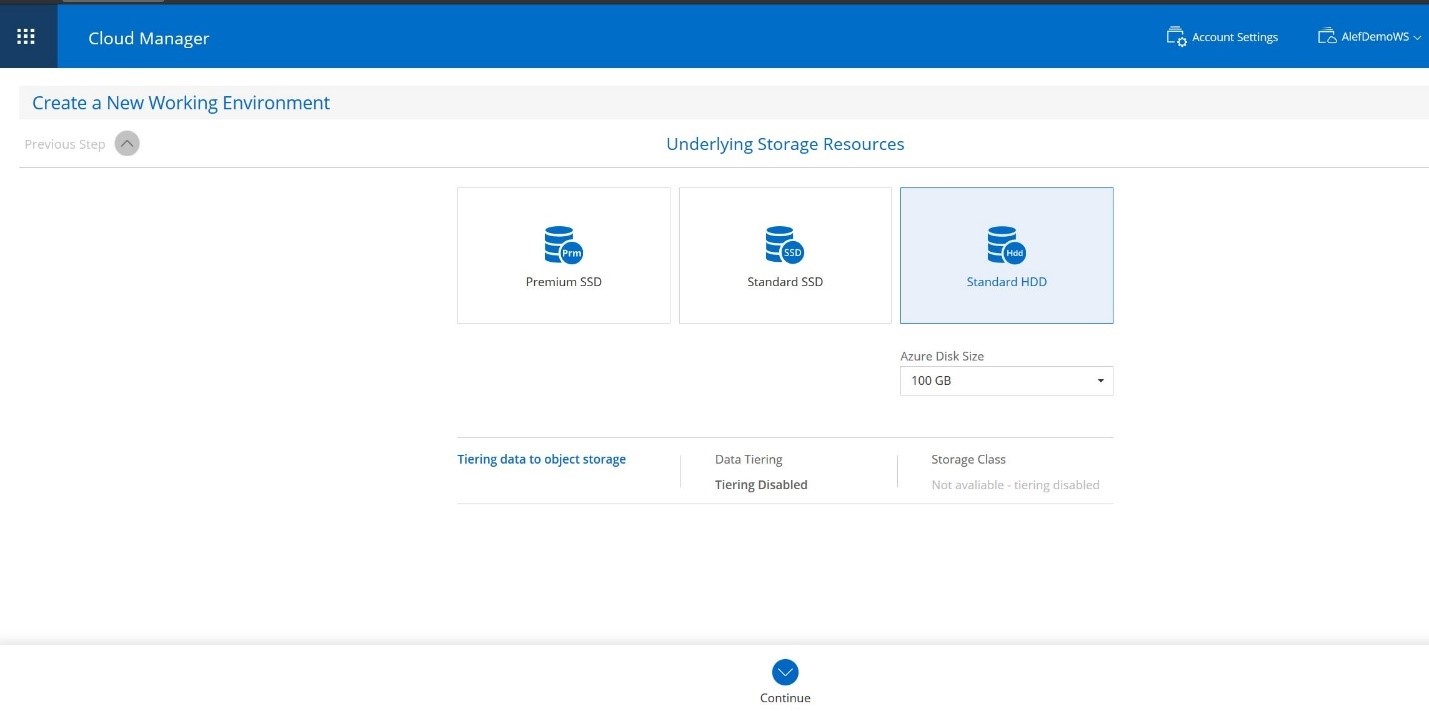
Selected Standard HDD and Azure Disk size 100GB ( min capacity for POC ). > Continue.
Write Speed & WORM

Normal check for Write Speed ; Disable WORM > Continue
Create Volume :

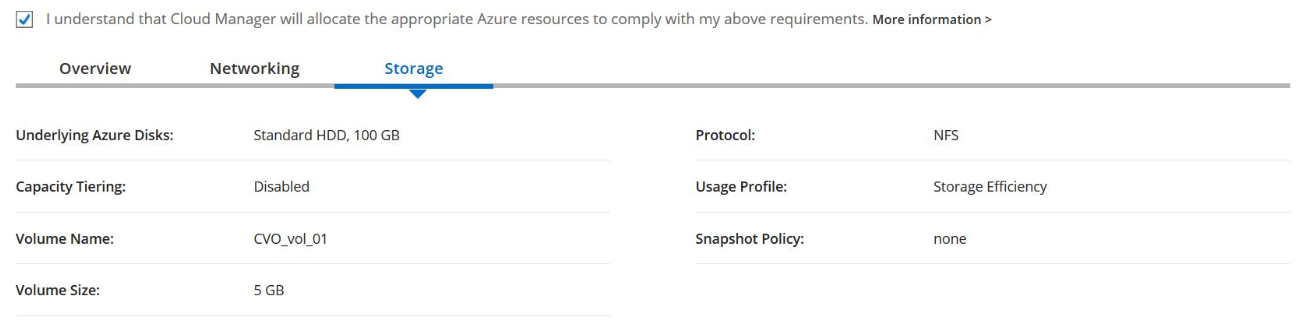
Set Volume name CVO_vol_01 , size 5Gb ; Snapshot Policy to none, Protocol NFS ; Custom export policy in subnet 100.2.0.0/16. > continue .
Create Volume – Usage Profile , Disk Type & Tiering Policy
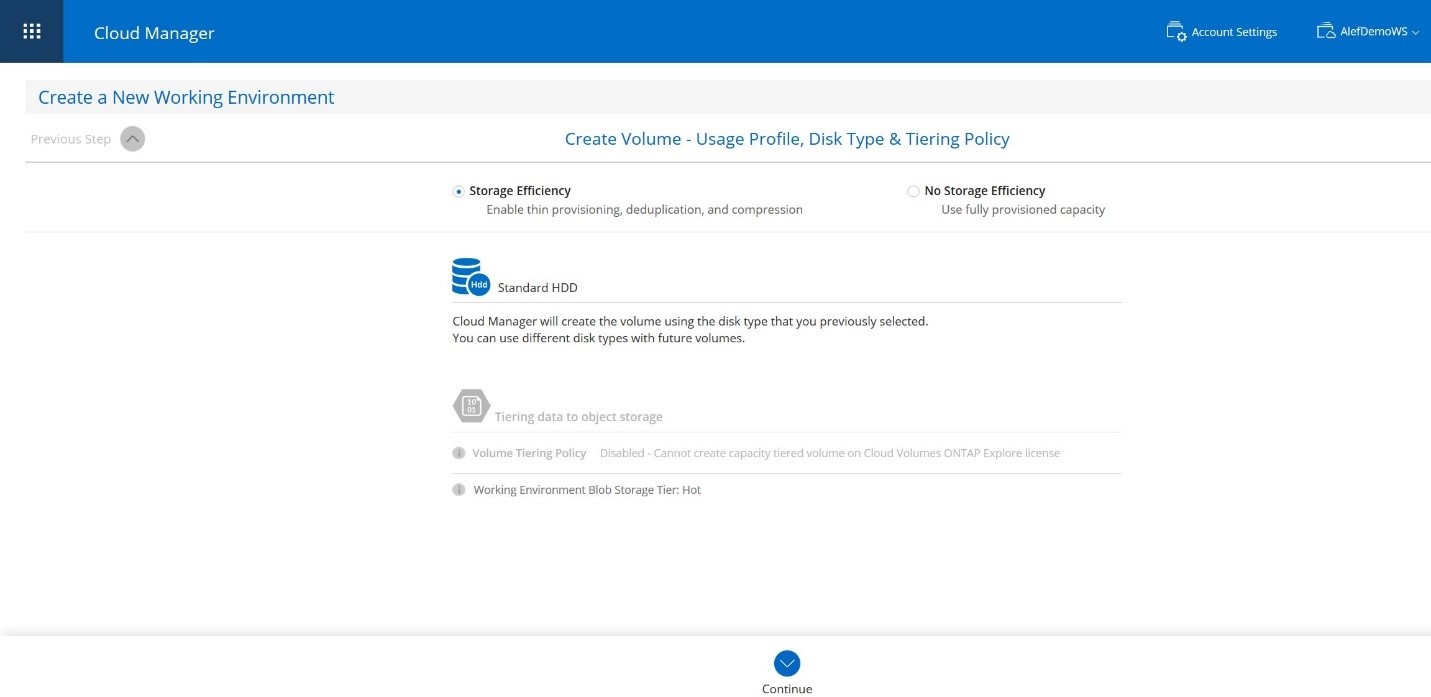
Set Volume name CVO_vol_01 , size 5Gb ; Snapshot Policy to none, Protocol NFS ; Custom export policy in subnet 100.2.0.0/16. > continue .
Create Volume – Usage Profile , Disk Type & Tiering Policy

- GO
Step 5B : Discover Cloud Volumes ONTAP > Select Microsoft Azure.
Note : CVO must be previously created for this step.
> Continue

Fill in required fields ( client , tenant and Secret ) and check in the verification agreement box.
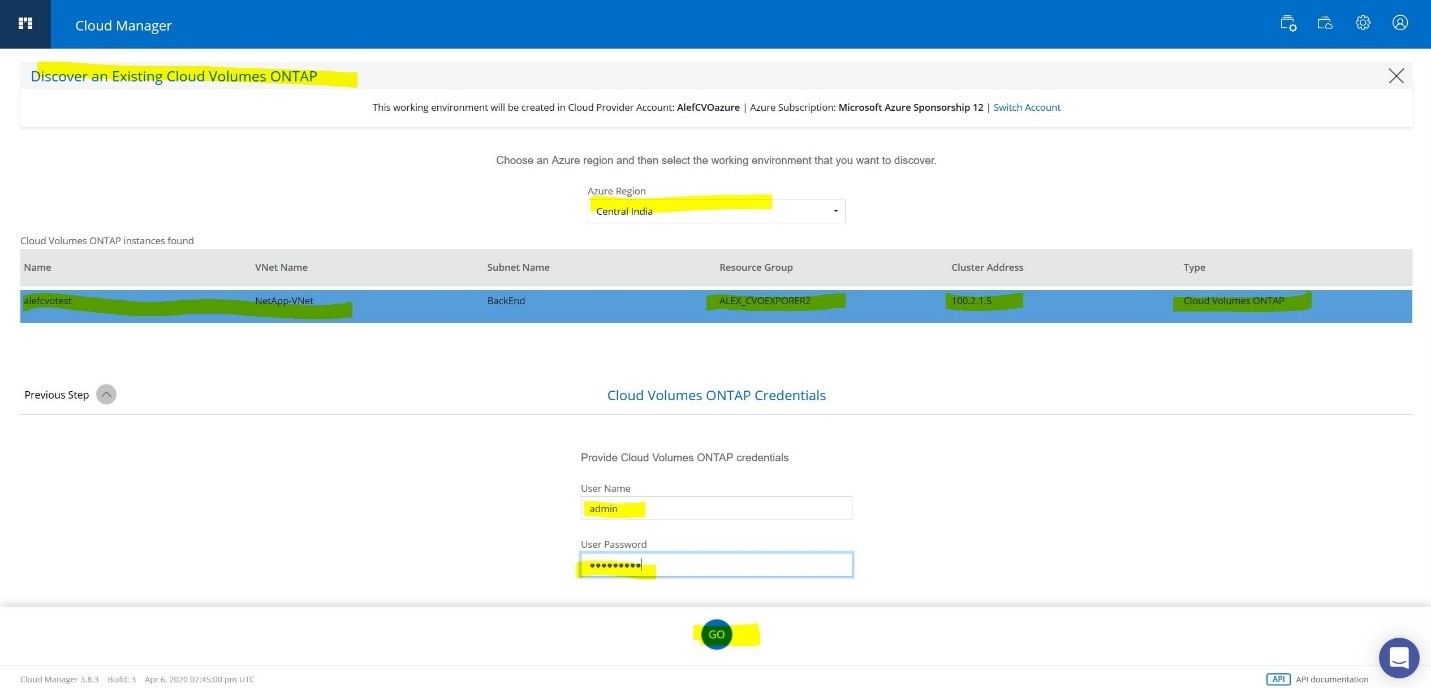
Select the Region CVO was created on , user and password of the CVO > GO

Result is CVO being added to Cloud Manager.
From Cloud Manager select the newly created CVO :
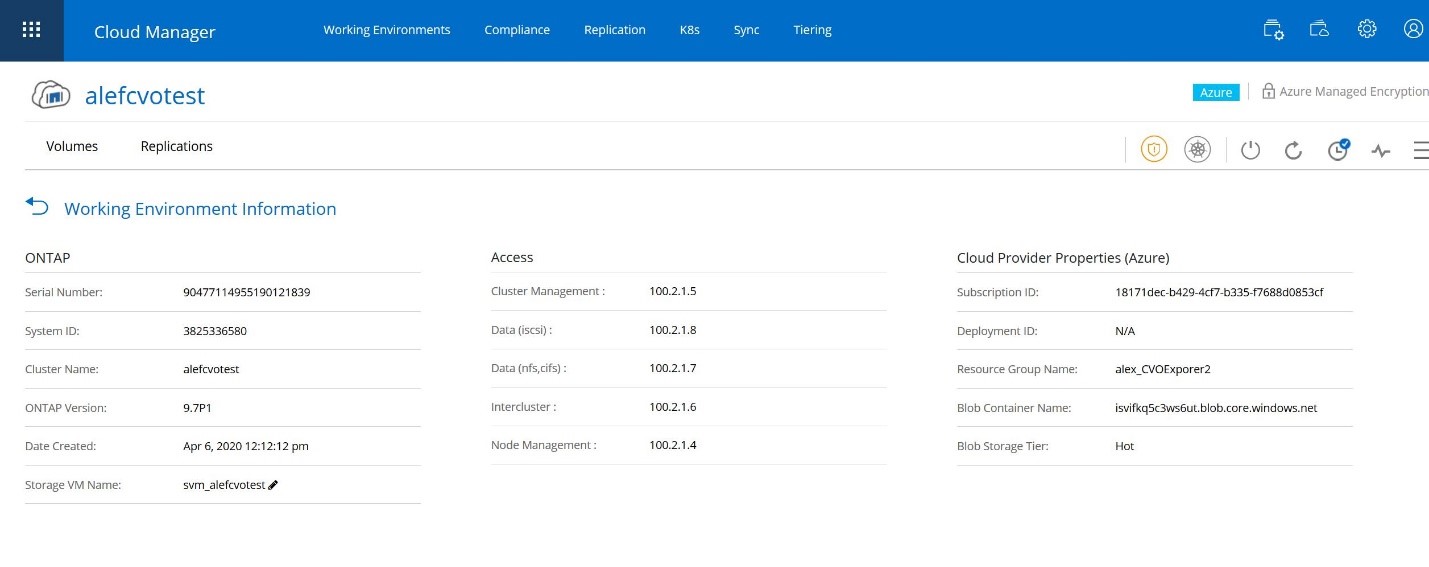
CVO has Cluster management ip in Backend subnet : 100.2.1.5 as above in the picture ; it can be accessed from the Cloud Manager GUI interface .
Step 6 : Create Disaster Recovery setup from Cloud Manager .
From Working Environments Drag the Source that is On Premises to the CVO created at Step 5A to initialize cluster peering.
Source Peering Setup:
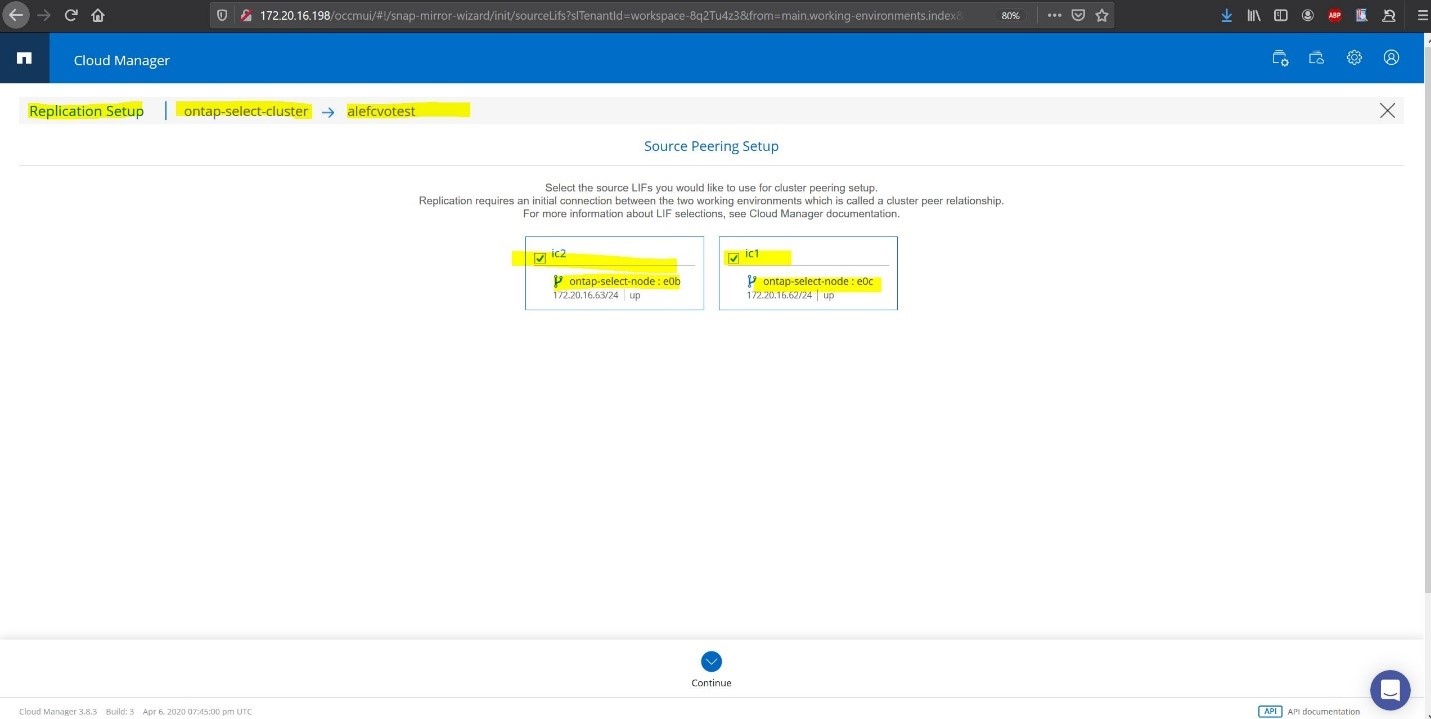
Select the Intra Cluster lifs IC1 and IC2 of the On Premises ONTAP Select. > Continue
NOTE : Cluster peering is done between inter cluster lifs IP’s ( the above IC’s are ip’s of inter cluster lifs created on Ontap Select Side ).
Source Volume Selection :
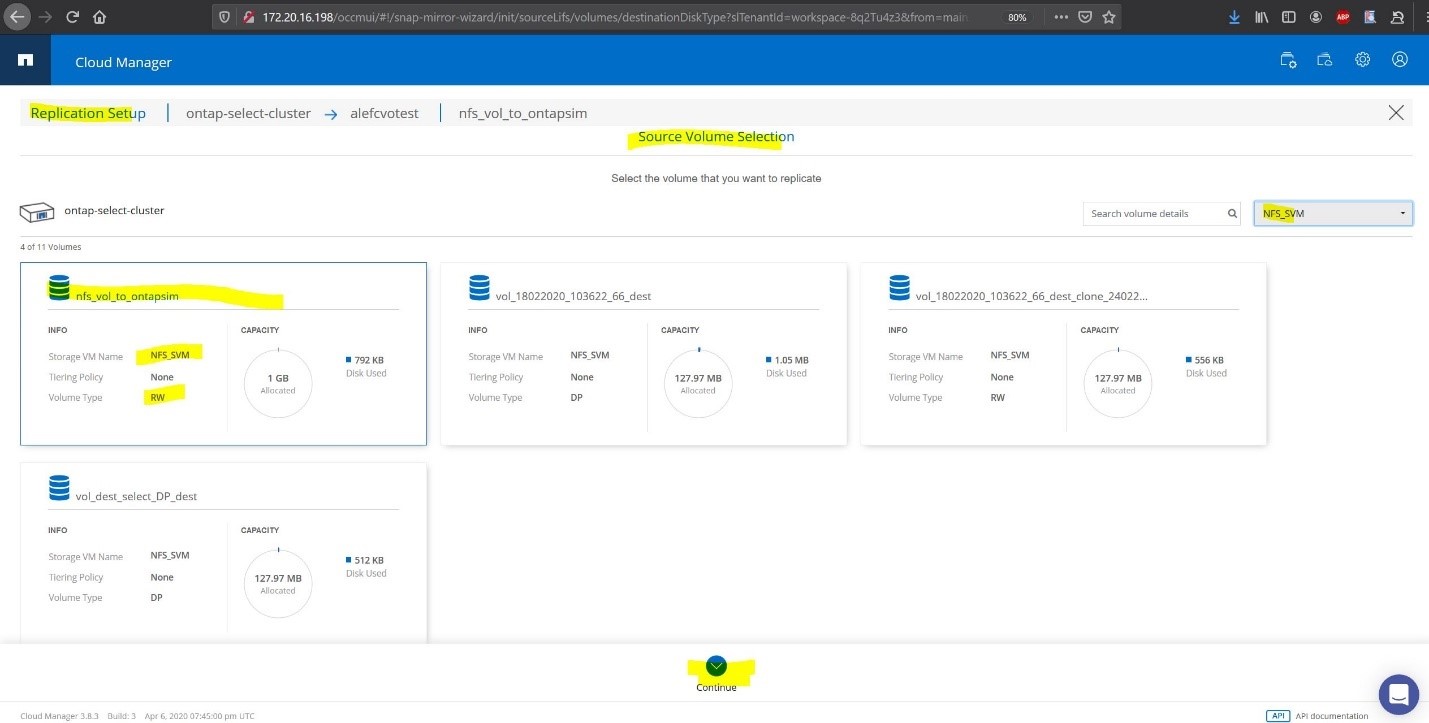
Select a NFS Volume from a NFS enabled SVM ( in the case above nfs_vol_to_ontapsim volume from SVM named NFS_SVM ) > Continue
Destination Volume Name:
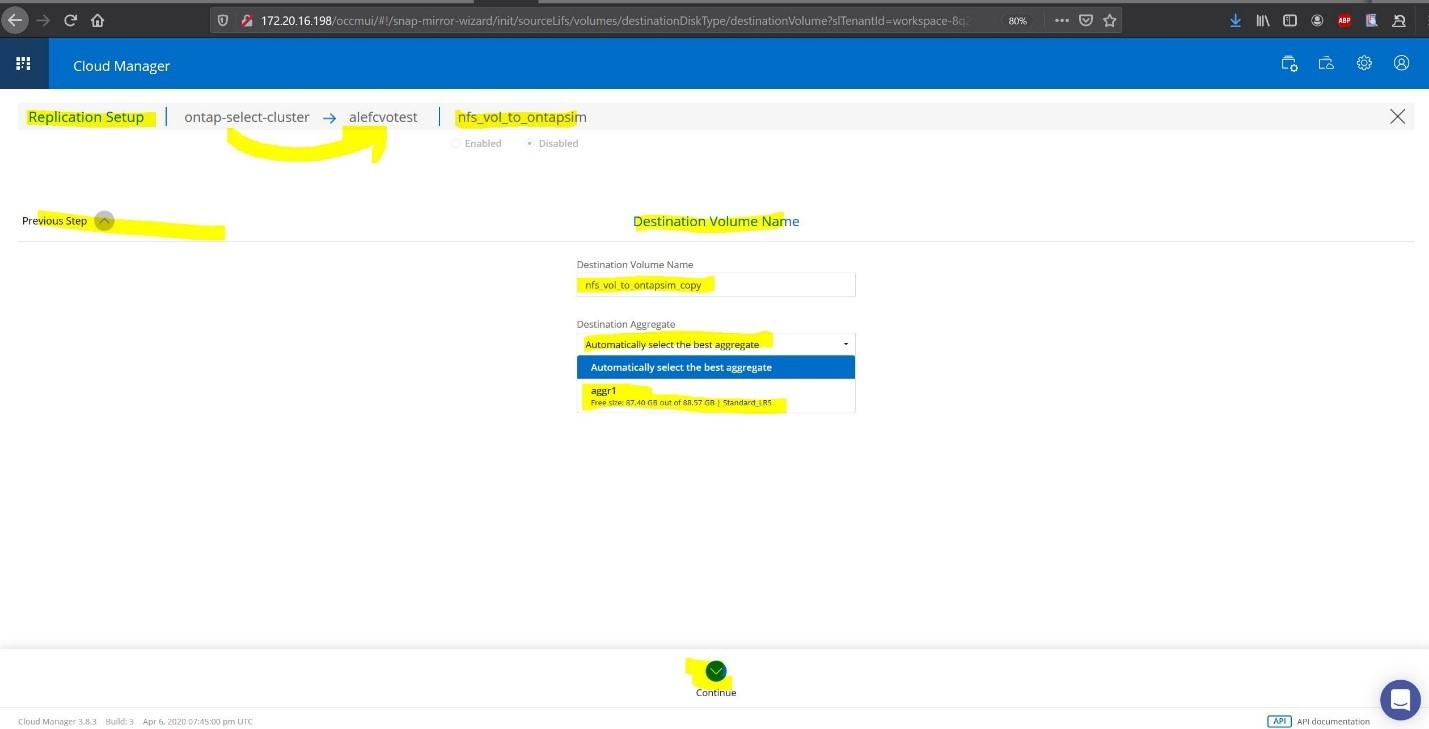
Destination name is prefilled with suffix _copy; Destination aggregate set to Automatically select the best aggregate > continue .
Max Transfer Rate :
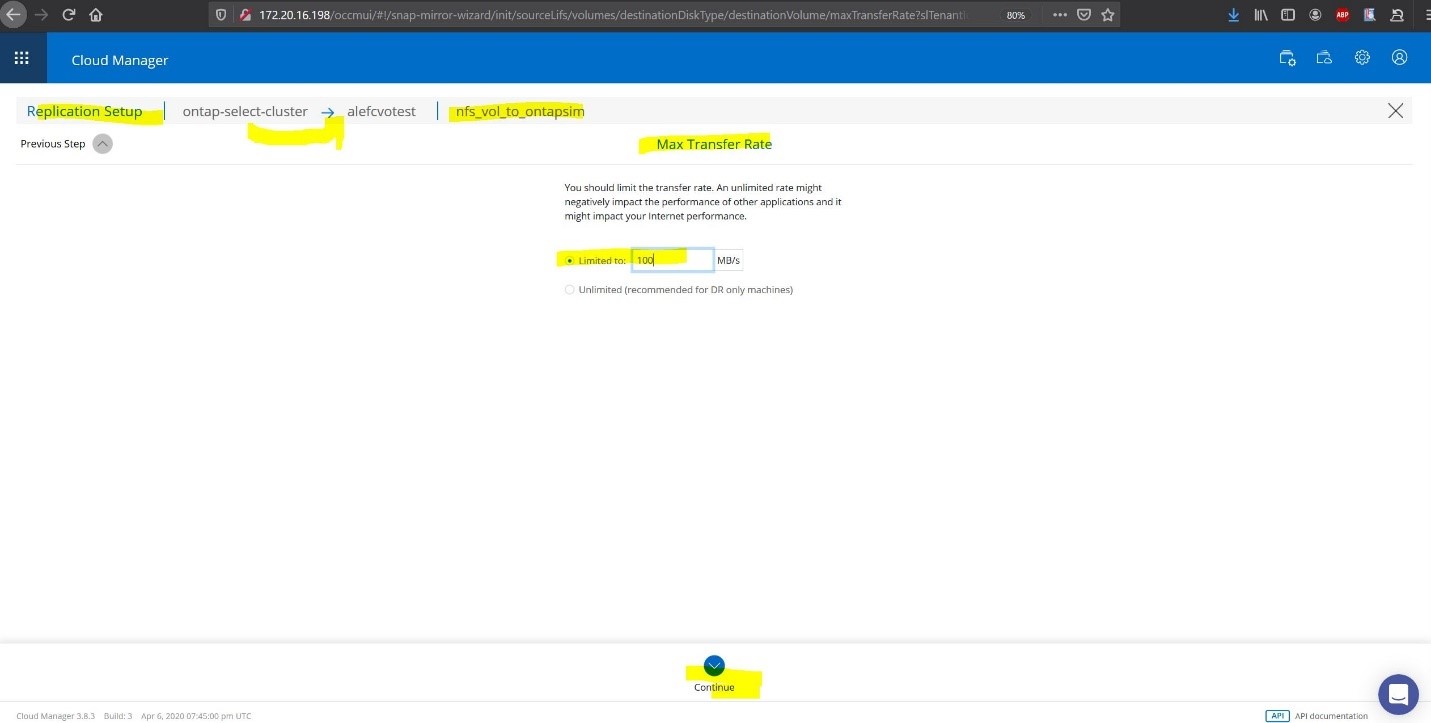
Select a limit of 100 MB/s for this POC. > Continue.
For Replication Policy we will use only Mirror:

We will not use a schedule ( this can be changed after the session is initialized ) :

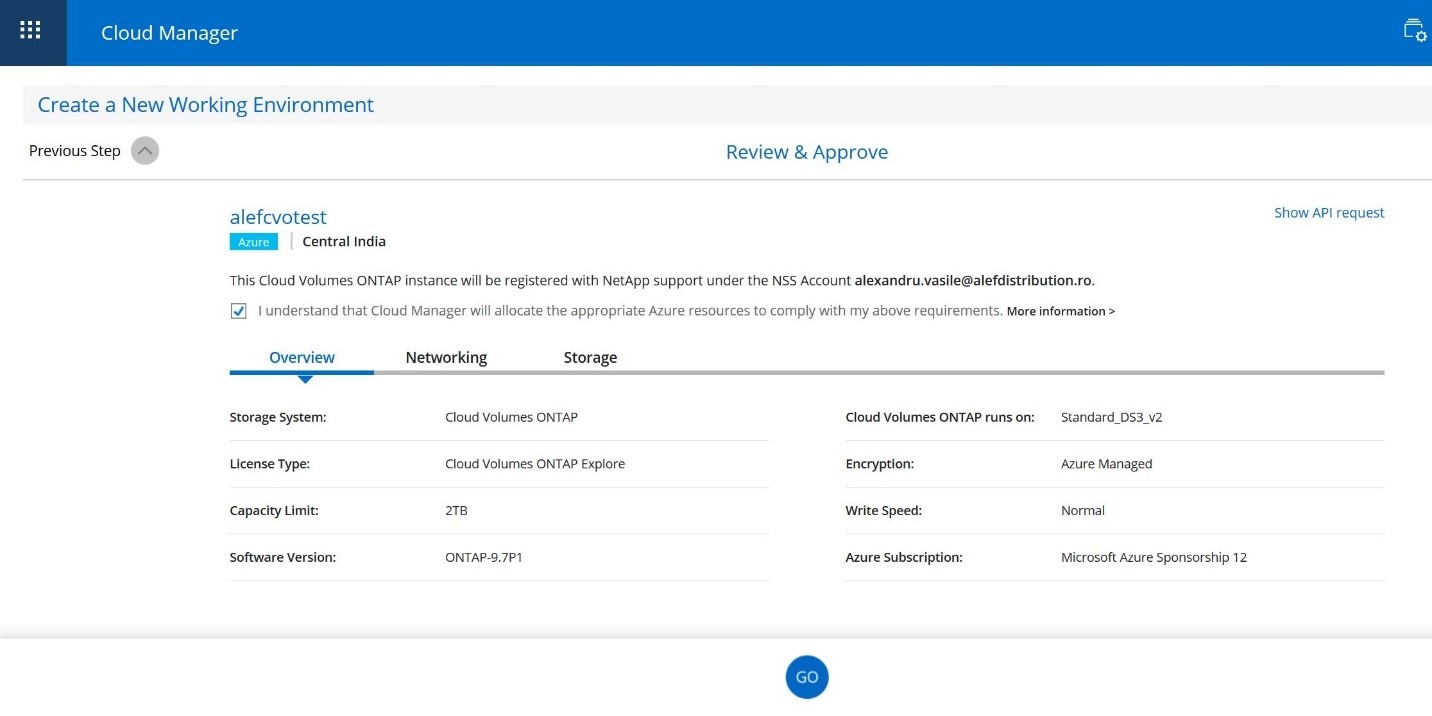
Review & Approve:
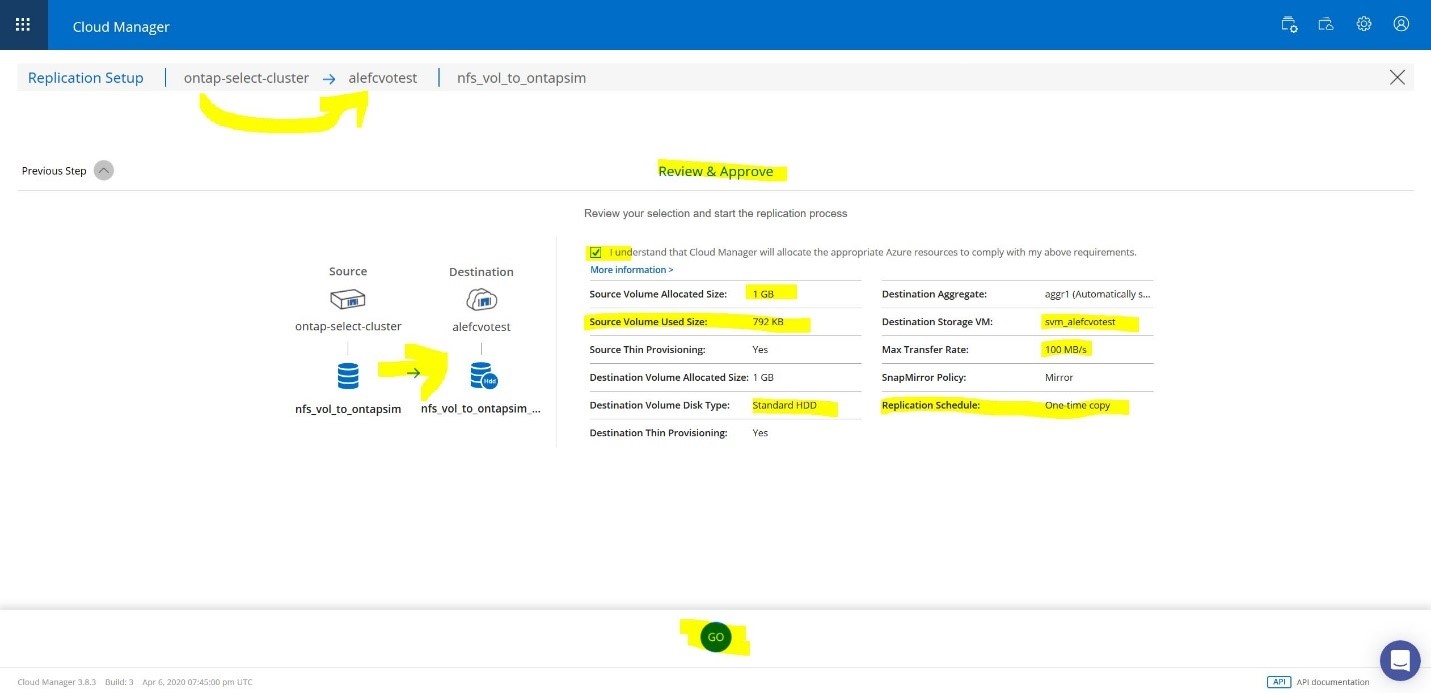
Check if everything is in order in the review panel and if all is ok > GO .

Go to Cloud Manager top pane, 3rd selection Replication:
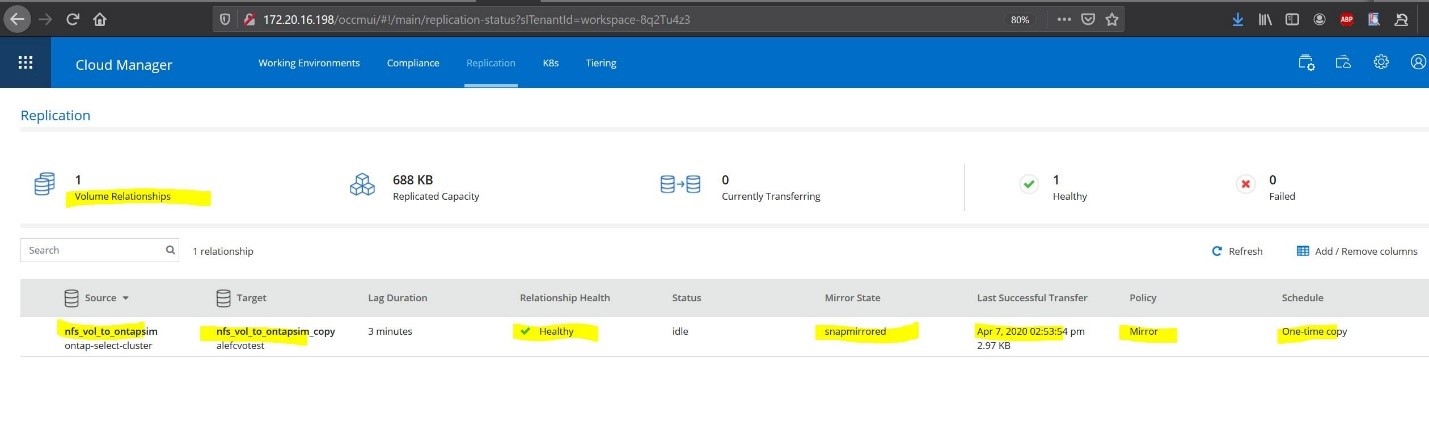
The relationship Created above shows up here.
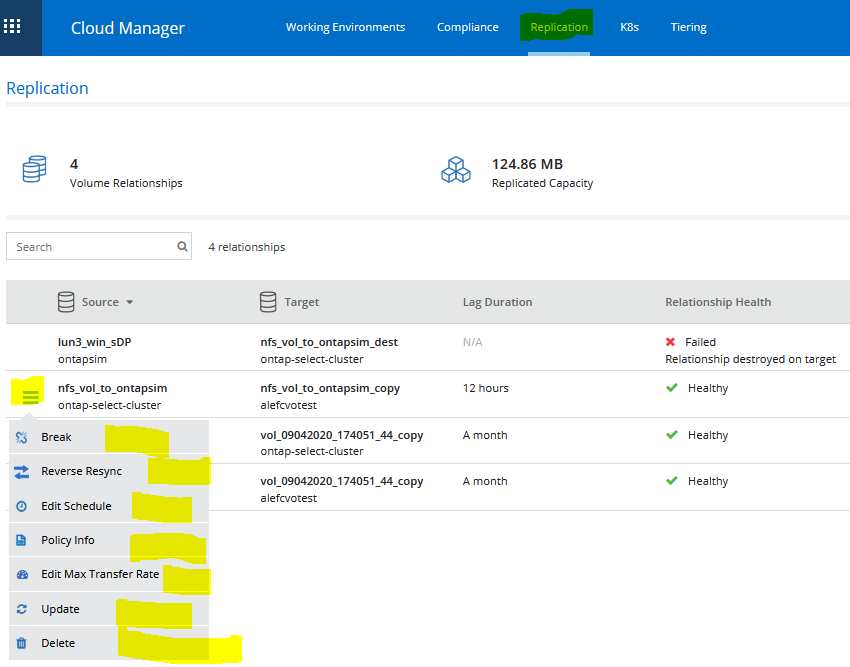
Several actions can be performed on the created relationship as in the screen below :
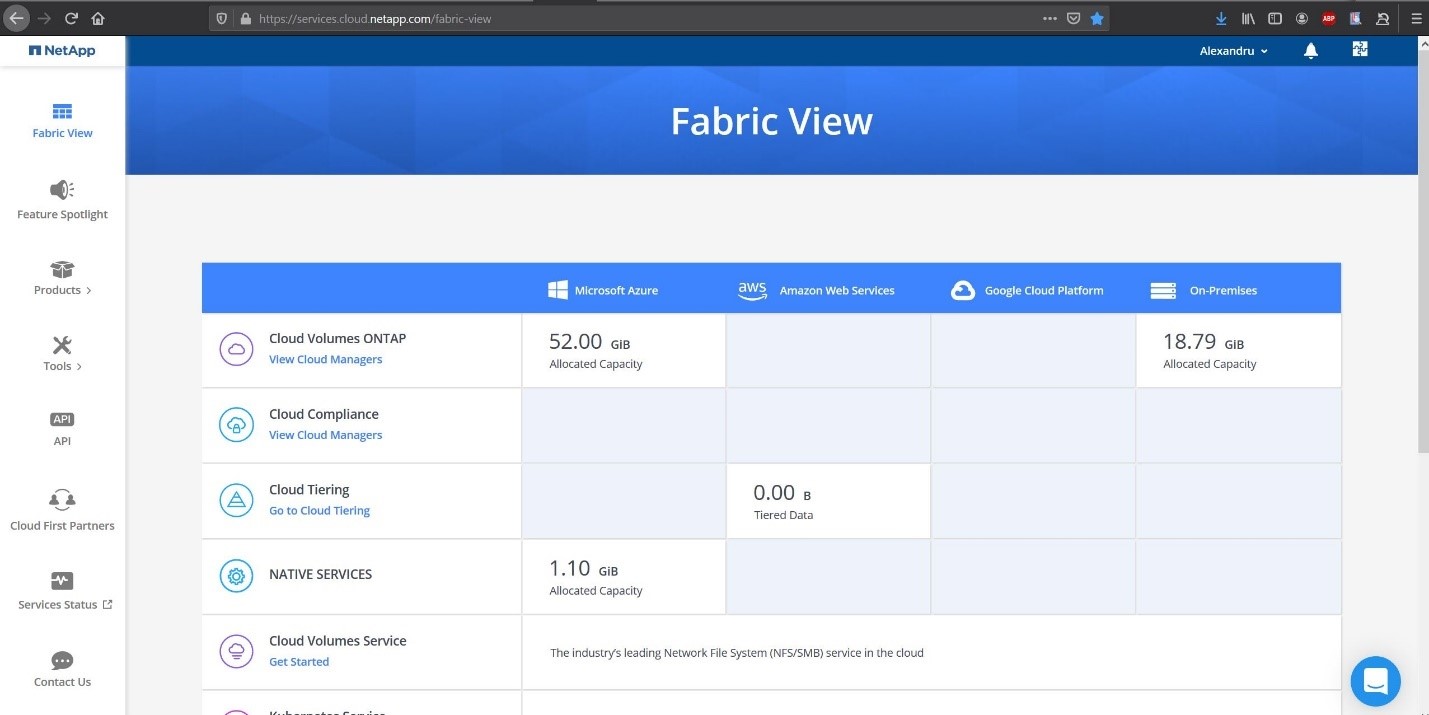
Now also the Fabric view will be updated : https://servoces.cloud.netapp.com/fabric-view
This concludes the POC DR setup.
Multiple ONTAP systems can be added by using the discovery feature of the Cloud Manager and Replication relationships between ONTAP devices can be managed and viewed.
Example of multiple ONTAP devices engaged in volume protection / DR.

Do you have questions about NetApp products?